The post PAN Aadhaar Link: How to Link Aadhaar and PAN Card Online After Deadline? appeared first on Razorpay Learn.
]]>The penalty for not linking Aadhaar and PAN is Rs. 1,000 as a late fee if individuals link Aadhaar and PAN after May 31st, 2024. Furthermore, a penalty of higher TDS/TCS collection is also imposed on Individuals and entities who haven’t linked their Aadhaar and PAN cards.
If you already made the request to link Aadhaar and PAN card, you can check the Aadhaar and PAN card link status online
How to Pay the Penalty Before Linking Aadhaar Card and PAN Card?
As mentioned previously, a penalty fee must be paid on the e-filing portal for linking Aadhaar with PAN card after May 31st, 2024. Before submitting a link request, ensure you have paid the required penalty.
Here’s the step by step guide on how to pay the penalty fee to link Aadhaar Card and PAN card
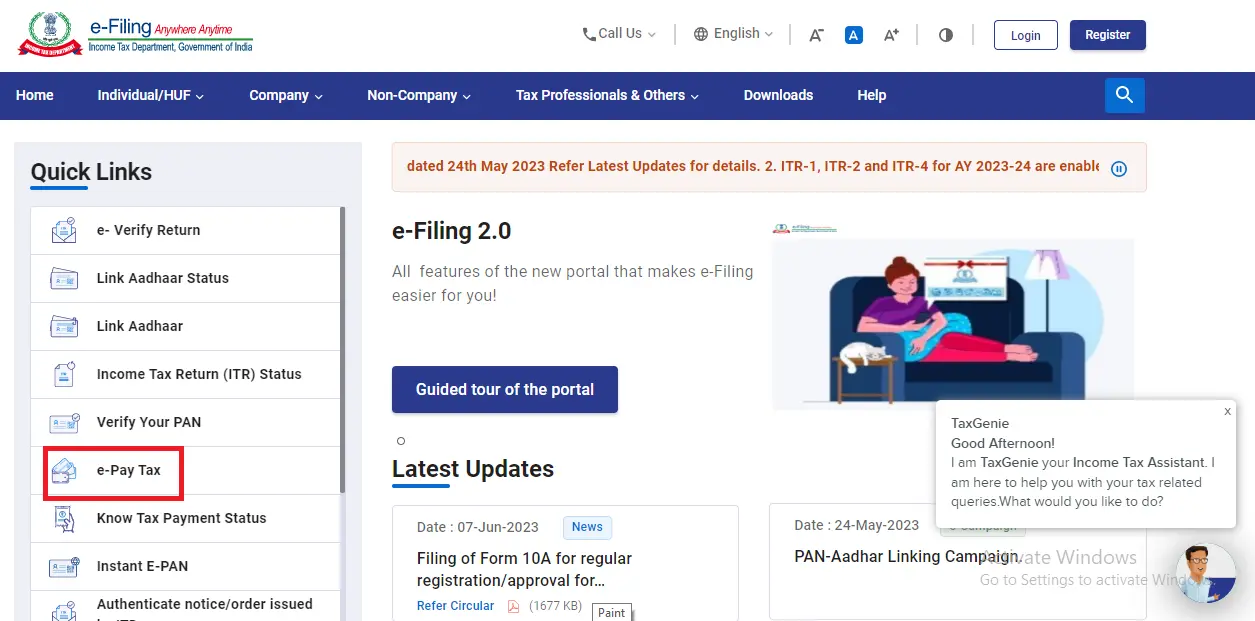
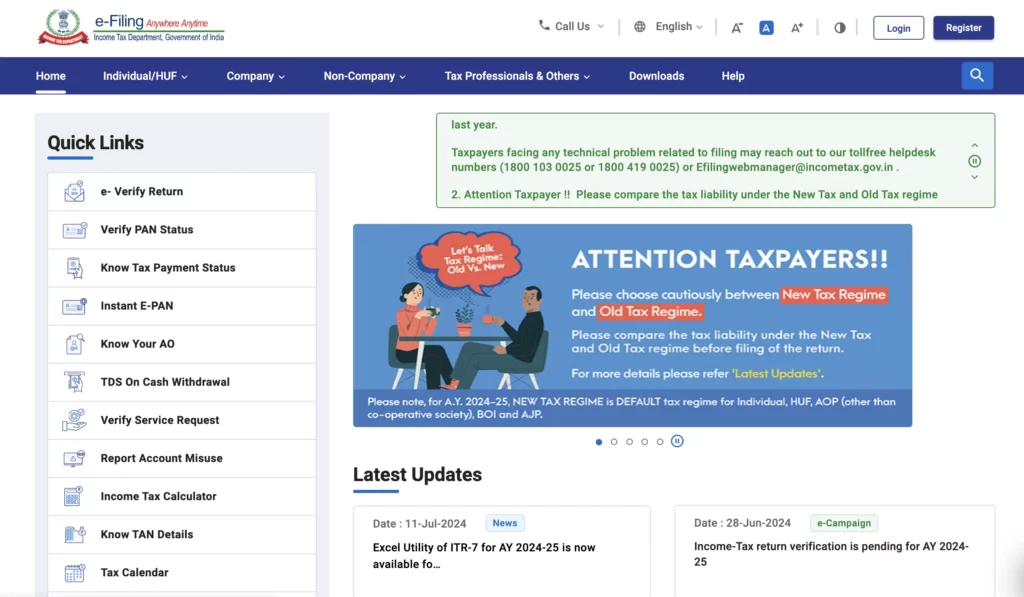
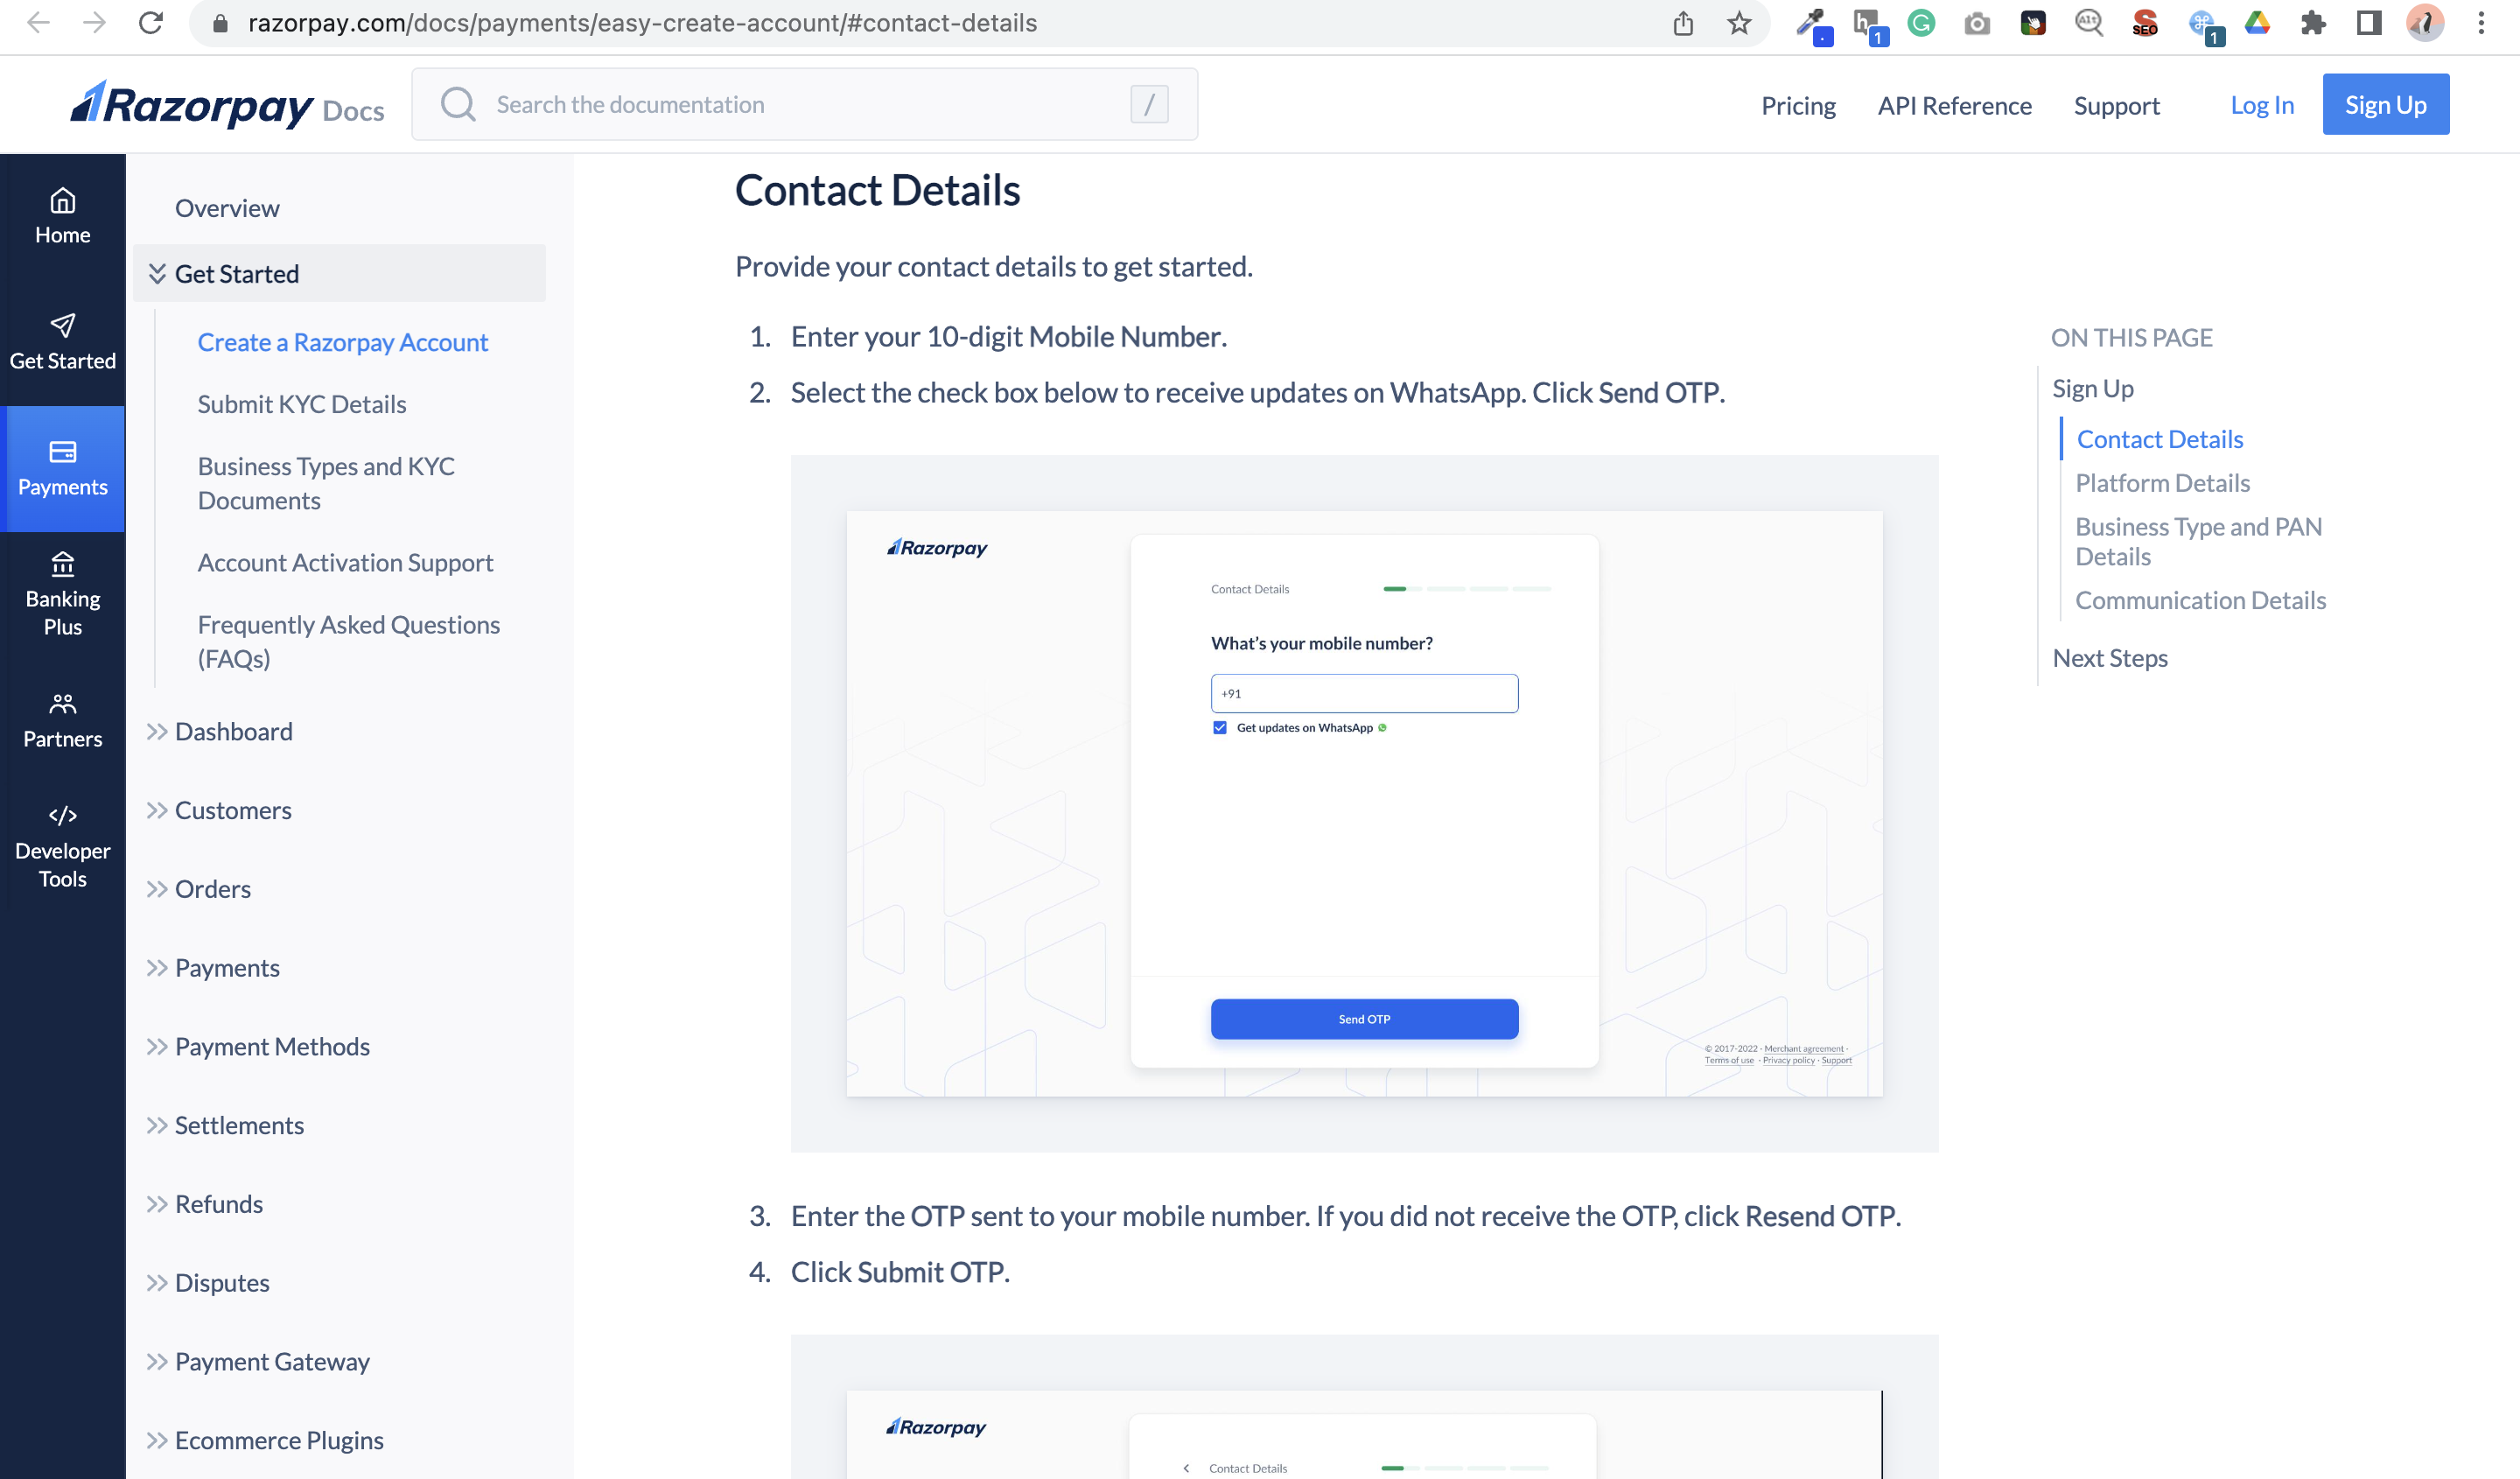
STEP 1: Visit the Income Tax e-filing portal
Go to the official Income Tax Department website.
STEP 2: Click on ‘e-Pay Tax’
Click the “e-Pay Tax” link under the “Quick Links” section.
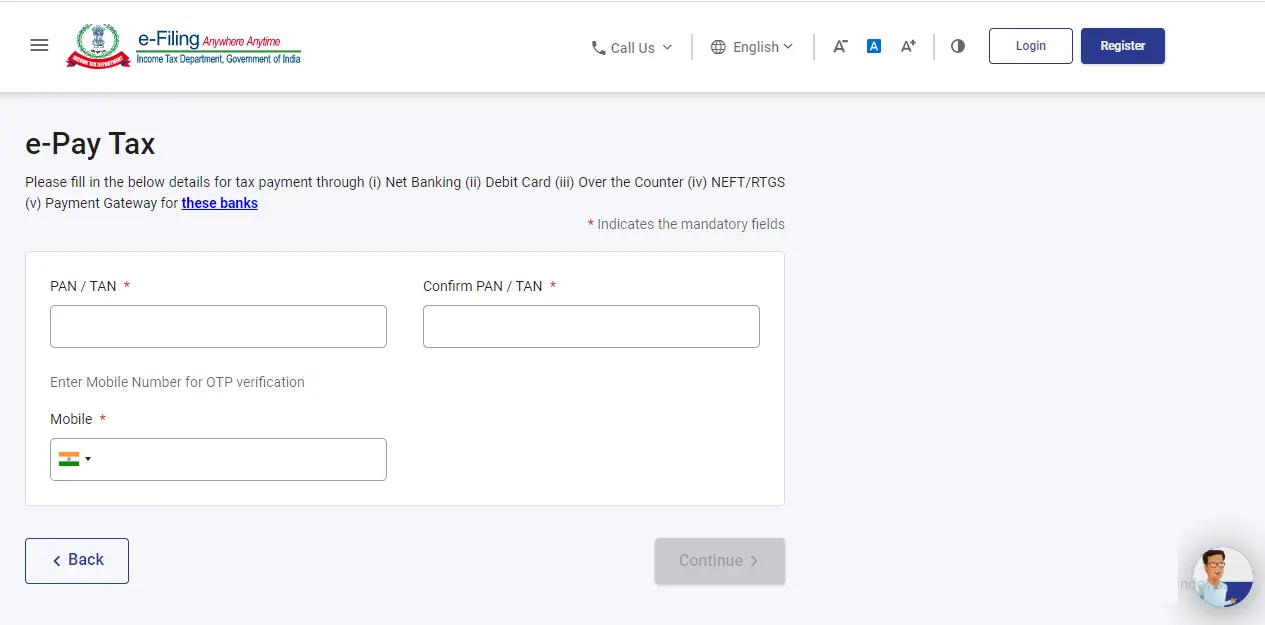
 STEP 3: Enter PAN/TAN details
Enter your PAN number under PAN/TAN number, Confirm PAN/TAN number and enter your registered mobile number in the designated field.
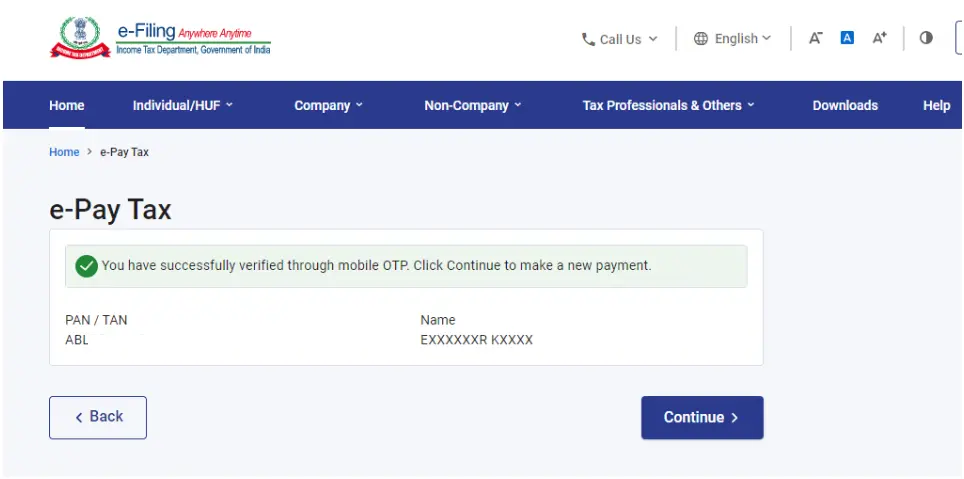
 STEP 4: OTP Verification
After OTP verification, you will be redirected to the e-Pay Tax page. Click the “Continue” button.
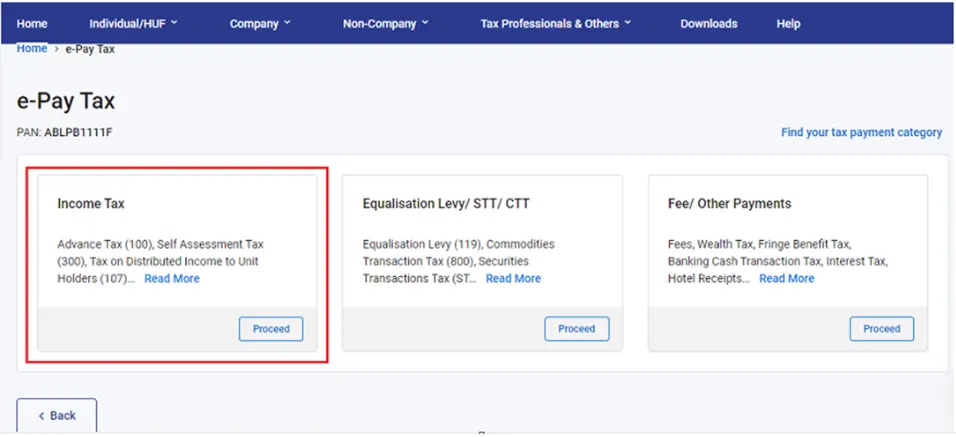
 STEP 5: Click Proceed Button Under Income Tax
Click the “Proceed” button under the Income Tax tab.
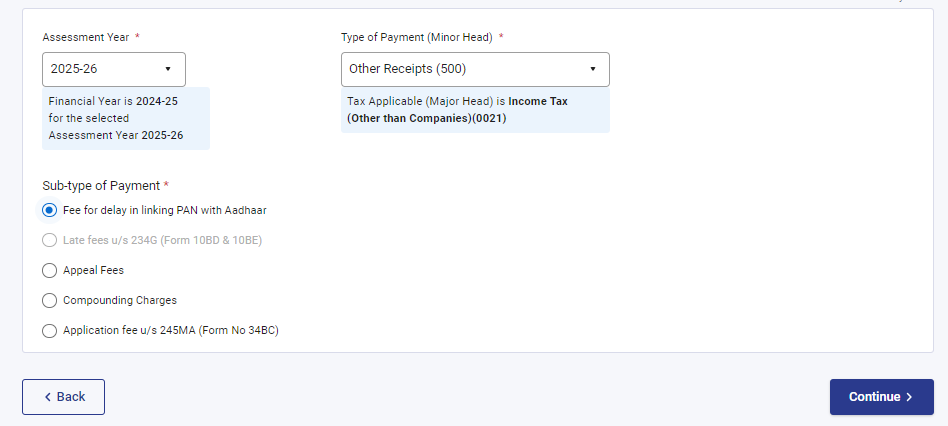
 STEP 6: Specify penalty details
- Assessment Year: Select the current financial year (e.g., 2024-25).
- Type of Payment (Minor Head): Choose ‘Other Receipts (500)’.
- Sub-type of Payment: Select ‘Fee for delay in linking PAN with Aadhaar’.
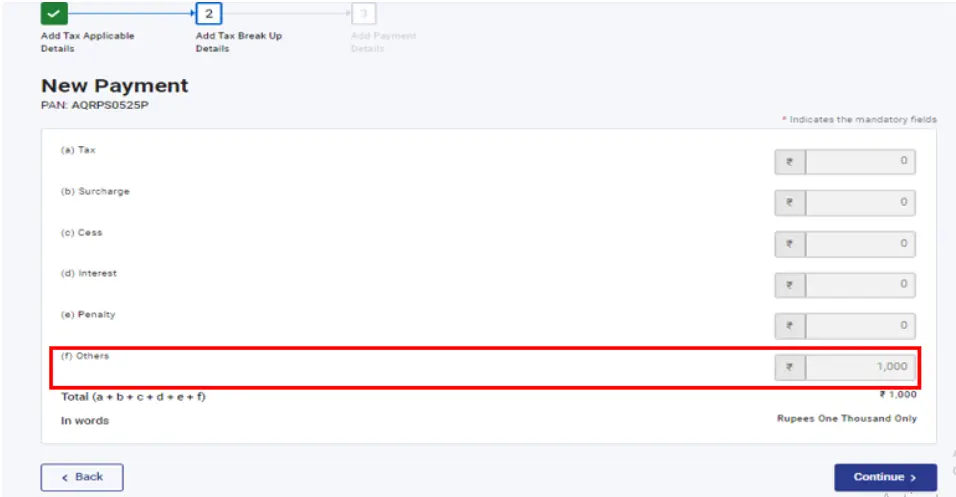
 STEP 7: Make the Payment
The penalty amount will be automatically filled in under the ‘Others’ option. Click ‘Continue’ to proceed with payment.
A challan will be generated. Choose your preferred payment method: net banking, debit card, over-the-counter, NEFT/RTGS, or payment gateway.
Payment gateway options are available for select banks:
- Axis Bank
- Bank of Baroda
- Bank of India
- Bank of Maharashtra
- Canara Bank
- Central Bank of India
- City Union Bank
- Federal Bank
- HDFC Bank
- ICICI Bank
- IDBI Bank
- Indian Bank
- Indian Overseas Bank
- IndusInd Bank
- Jammu & Kashmir Bank
- Karur Vysya Bank
- Kotak Mahindra Bank
- Punjab & Sind Bank
- Punjab National Bank
- RBL Bank
- South Indian Bank
- State Bank of India
- UCO Bank
- Union Bank of India
After the payment process, proceed to link your Aadhaar and PAN card immediately.
Read More: What is a Payment Gateway and How Does it Work?
How to Link Aadhaar and PAN Card Online in 2024?
There are two methods to link your Aadhaar card and PAN card:
- Method 1: PAN Aadhaar link without logging in to your account
- Method 2: PAN Aadhaar link after logging in to your account
Method 1. How to Link Aadhaar and PAN Card Without Logging in to your Account?
STEP 1: Visit the Income Tax e-Filing Portal
Go to the official Income Tax Department website.
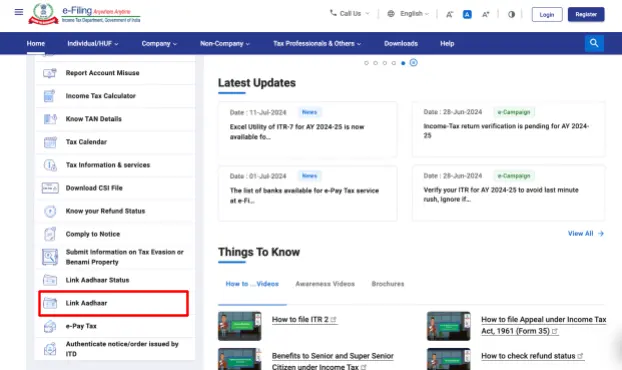
 STEP 2: Locate “Link Aadhaar”
Look for the “Link Aadhaar” option under the Quick Links section on the left side of the homepage.
 STEP 3: Enter PAN and Aadhaar Number to Validate
Enter your PAN and Aadhaar number accurately in the designated fields and click validate.
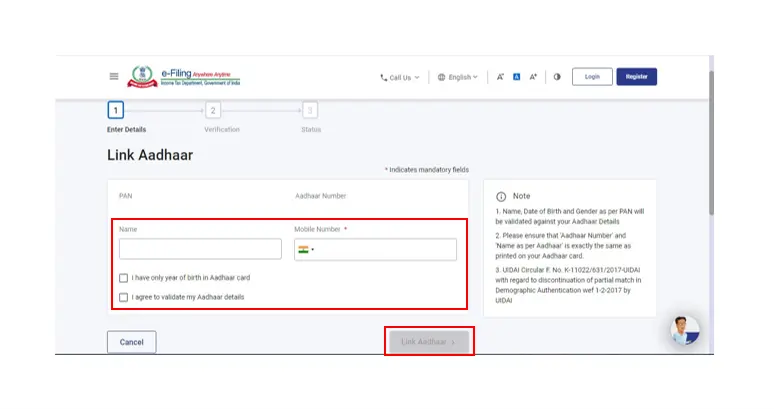
 STEP 4: Enter Name and Mobile Number
Enter your name as per Aadhaar, registered mobile number and click link Aadhaar.
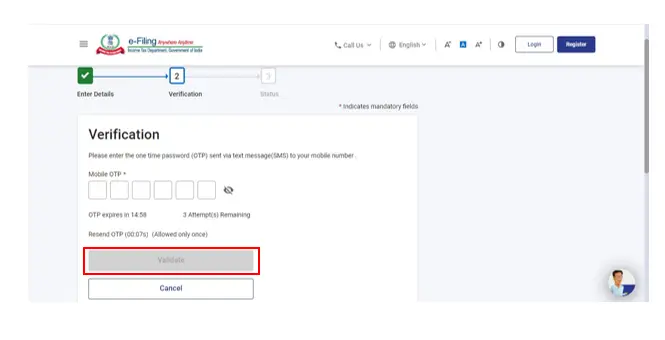
 STEP 5: OTP Verification
An OTP will be sent to your registered mobile number. Enter the 6 digit OTP and click on validate button
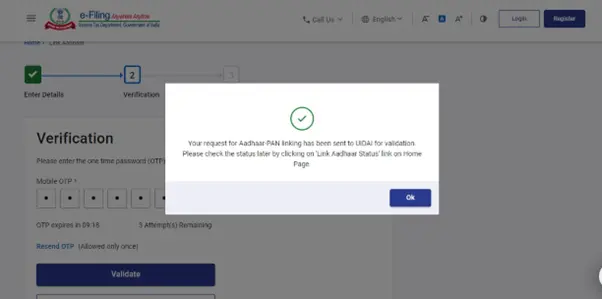
 STEP 6: Submission
Once the OTP is verified, your Aadhaar-PAN linking request will be submitted.
Method 2. How to Link Aadhaar and PAN Card After Logging in to your Account?
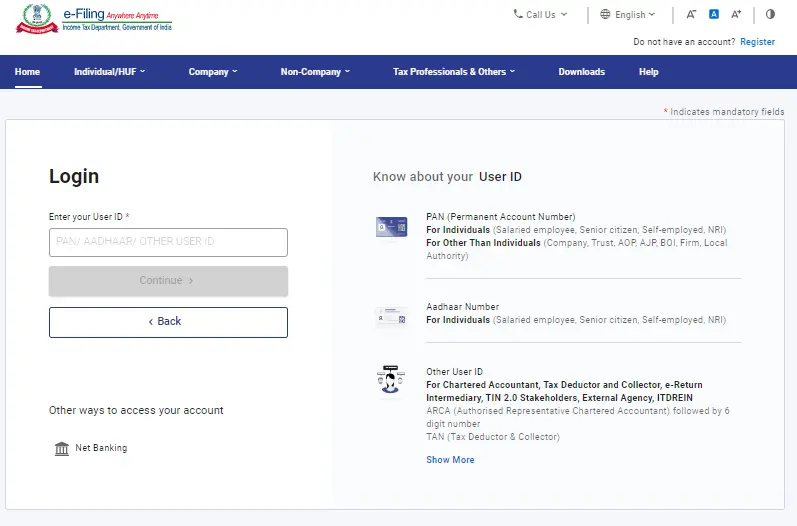
STEP 1: Go to Income Tax e-filing Portal > Log In
Visit the Income Tax e-filing Portal and click on the “Log In” button.
 STEP 2: Log in to Income Tax e-Filing Portal
Enter your User ID as Aadhaar number/PAN number and click the “Continue” button.
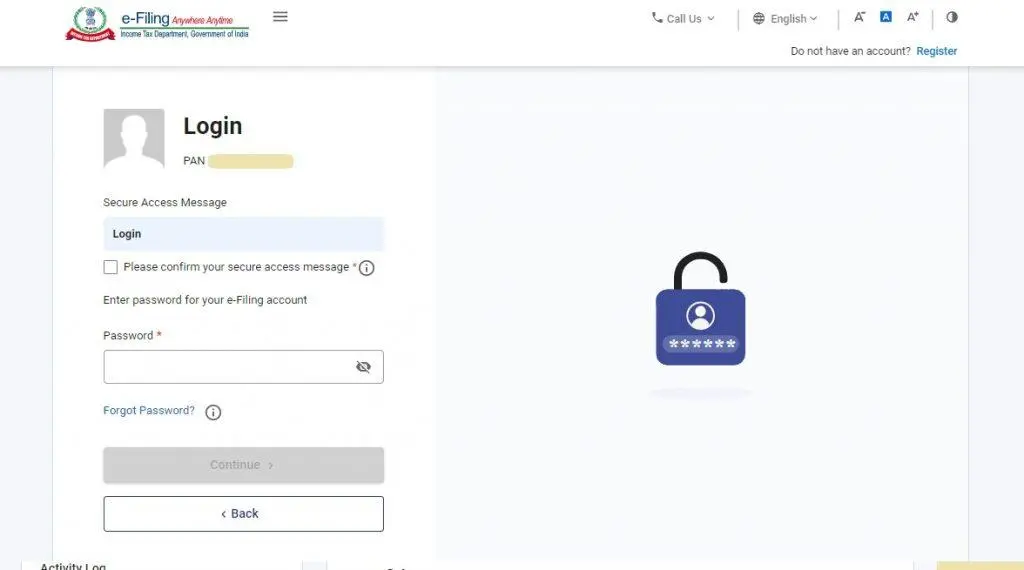
STEP 3: Enter Your Password
Enter your password created during registration and click “Continue” button to access your profile. If you’ve forgotten your password, click the “Forgot password” link.
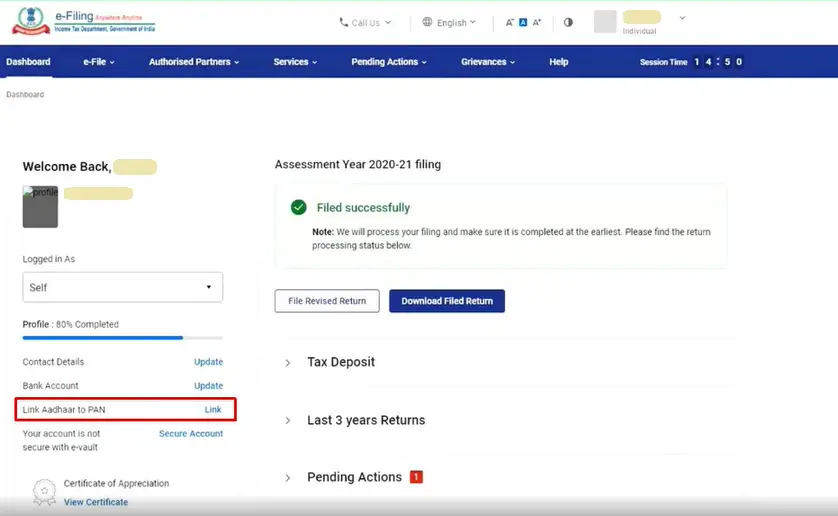
 STEP 4: Navigate to Profile Section > Link Aadhaar to PAN Option
Look for the “Profile” section on your dashboard. Under the “Profile” section, click on the “Link Aadhaar to PAN” option.
 STEP 5: Enter Aadhaar Number
Enter your Aadhaar number accurately in the designated field.
 STEP 6: Aadhaar to PAN Link Confirmation
A pop-up message will confirm successful Aadhaar linking to your PAN.

FAQs
1. What is the PAN Aadhaar link last date in 2024?
31st May 2024 is the last date to link Aadhaar and PAN card without penalty. However, still you can link with penalty fees.
2. What are the documents required to link Aadhaar and PAN card?
- Aadhaar Card
- PAN Card
- Registered mobile number linked to Aadhaar
3. How long does it take to link Aadhaar and PAN card?
Once you submit the request to link your Aadhaar with your PAN, it may take 7 to 30 days for the process to complete and your PAN card to be reactivated.
4. What if there is a mismatch in name between Aadhaar card and PAN card?
If there’s a name mismatch between your Aadhaar and PAN cards, linking them might be problematic. It’s advisable to correct any discrepancies in your Aadhaar card before proceeding.
5. Can I link multiple Aadhaar cards to one PAN card?
As per Indian law, each individual is entitled to only one PAN card and one Aadhaar number, both of which must be unique. Therefore, linking multiple PAN cards to a single Aadhaar number is prohibited.
6. Is PAN Aadhaar link free?
No, linking PAN and Aadhaar is not free. There was a deadline of 30th June 2023 to link them without a penalty, but that has passed. Now, you need to pay a penalty of Rs. 1,000 to link your PAN and Aadhaar.
7. How to check PAN-Aadhaar link status via SMS?
To check your PAN-Aadhaar link status via SMS, follow these steps:
- Compose a new SMS: Type “UIDPAN <12-digit Aadhaar number> <10-digit PAN number>” (without quotes).
- Send the SMS: Send this message to either 567678 or 56161.
- Wait for the response: You will receive an SMS indicating whether your Aadhaar is linked to your PAN.
8. Who is exempt from the PAN Aadhaar link?
Individuals residing in Jammu and Kashmir, Assam, or Meghalaya; non-resident taxable persons as per the Income Tax Act, 1961; and individuals aged 80 years or older (super senior citizens).
9. What is the alternate way to link Aadhaar to PAN card?
You can link your Aadhar and PAN cards using SMS. Simply send a text message with this format: “UIDPAN [your 12-digit Aadhar number] [your 10-character PAN number]” to the number provided by the Income Tax Department. You’ll get a confirmation message once the linking is done.
10. Who needs to link Aadhaar and PAN card?
If you have a PAN card and were assigned one on or before July 1, 2017, and you have an Aadhaar number, you need to link your Aadhaar to your PAN. This is required by law for everyone who meets these conditions.
The post PAN Aadhaar Link: How to Link Aadhaar and PAN Card Online After Deadline? appeared first on Razorpay Learn.
]]>The post Aadhaar PAN Link Status Check: How to Check Status Online in 2024? appeared first on Razorpay Learn.
]]>How to Check Aadhaar and PAN Card Link Status Online?
There are three ways to check your PAN Aadhaar link status: without logging into the income tax portal, by logging into the portal, or via SMS.
Here is each method in detail to check PAN Aadhaar Link Status:
Method 1: Check PAN Aadhaar Card Link Status Without Logging into the Income Tax Portal
STEP 1: Open the Income Tax e-filing portal.
 STEP 2: Navigate to the Link Aadhaar Status under the Quick Links section on the portal.
 STEP 3: Type in your PAN and Aadhaar number and click “View Link Aadhaar Status”.
Upon successful validation, a message regarding your Aadhaar-PAN linking status will be displayed. If your Aadhaar is linked to your PAN card, the message will read: “Your PAN is already linked to the given Aadhaar.”
 When your Aadhaar-PAN link is being processed, you will see a notification stating:
“Your Aadhaar-PAN linking request has been sent to UIDAI for validation. Please check the status later by clicking on the ‘Link Aadhaar Status’ link on the Home Page.”
If your Aadhaar is not linked with your PAN card, the notification will state:
“PAN not linked with Aadhaar. Please click on ‘Link Aadhaar’ to link your Aadhaar with PAN.”
Method 2: Check PAN and Aadhaar Card Link Status by Logging into the Income Tax Portal
STEP 1: Open the Income Tax e-filing portal.
STEP 2: Click on Login.
 STEP 3: Navigate to Link Aadhaar Status Option
Navigate to the homepage and either go to the ‘Dashboard’ or ‘My Profile’, then select the ‘Link Aadhaar Status’ option.
If your Aadhaar is successfully linked to your PAN card, the Aadhaar number will be displayed. If they are not linked, the message ‘Link Aadhaar Status‘ will be shown.
If your linking request is still being validated by the Unique Identification Authority of India (UIDAI), you will need to check the status at a later time.
Method 3: Check PAN Card and Aadhaar Card Link Status Through SMS
You can check the status of your Aadhaar-PAN linking using SMS by following these steps:
STEP 1: Draft SMS to UIDPAN
Draft an SMS in this format: UIDPAN <12-digit Aadhaar number> <10-digit PAN number> and send it to either ‘567678’ or ‘56161’.
STEP 2: Receive Confirmation of Successful Linking
If your Aadhaar is linked to your PAN, you will receive a message saying: “Aadhaar is already associated with PAN (number) in the ITD database. Thank you for using our services.”
STEP 3: Receive Notification of Non-Linking
If your Aadhaar is not linked to your PAN, the message will state: “Aadhaar is not associated with PAN (number) in the ITD database. Thank you for using our services.”
Read About: How to Download an Aadhaar Card using Various Methods?
How to link Aadhaar with a PAN Card Online?
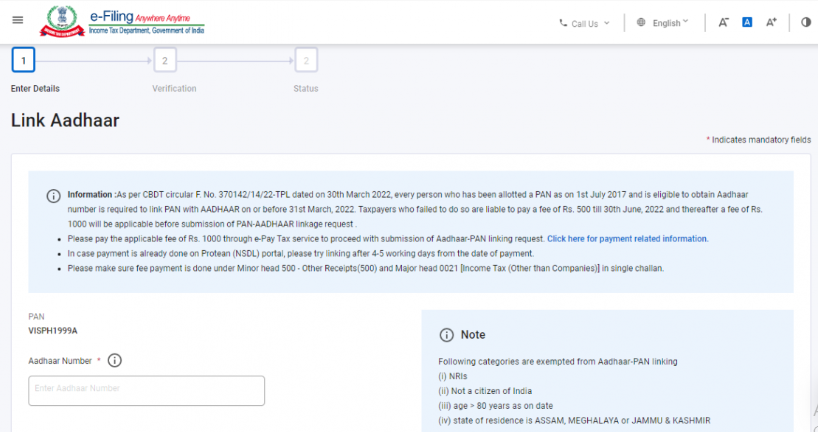
If your Aadhaar is not linked with your PAN card, you have the option to request Aadhaar-PAN linking by paying a late penalty of Rs.1,000 on the Income Tax website.
Here are the steps:
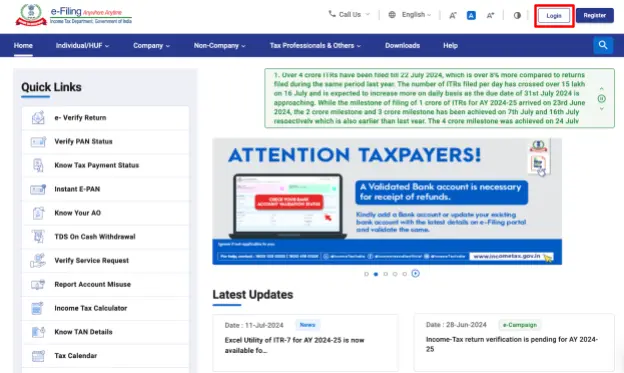
STEP 1: Open the Income Tax e-filing portal.
STEP 2: Click on the ‘Link Aadhaar’ under the ‘Quick Links’ section.
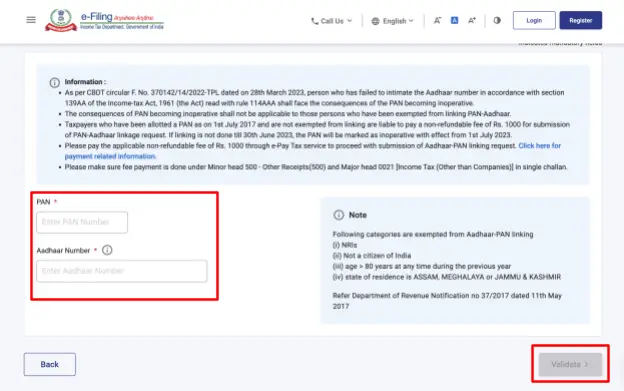
 STEP 3: Enter the ‘PAN Number’ and ‘Aadhaar Number’, then click the ‘Validate’ button.
 STEP 4: Proceed by clicking the ‘Continue to Pay Through e-Pay Tax’ button.
STEP 5: Enter your PAN and mobile number, then click ‘Continue’.
STEP 6: Click the ‘Proceed’ button under the ‘Income Tax’ tab.
STEP 7: Complete the payment of the challan amount and click ‘Continue’.
STEP 8: Navigate to the ‘Quick Links’ section and select ‘Link Aadhaar’.
STEP 9: Enter your PAN and Aadhaar details, then click the ‘Validate’ button.
STEP 10: Provide your Aadhaar number, mobile number, OTP, and click ‘Validate’.
Related Read: How to Link Aadhaar to PAN? A Step-By-Step Guide
PAN Aadhaar Link Fees/Charges
As of July 1, 2023, there is a penalty of ₹1,000 for linking your PAN with your Aadhaar card after the deadline through the Income Tax website.
Here’s a breakdown of the timeline for PAN-Aadhaar linking fees:
- Before March 31, 2022: Linking was free of charge.
- April 1, 2022 – June 30, 2022: A penalty of ₹500 applied.
- July 1, 2023 onwards: The penalty increased to ₹1,000.
It’s important to note that these fees apply specifically to linking your PAN and Aadhaar through the Income Tax website. There may be additional charges or procedures involved if you link your PAN and Aadhaar through other channels.
Related Read: How To Change Aadhaar Card Name Online and Offline?
Exemptions from PAN-Aadhaar Linking
Not everyone is required to link their PAN with Aadhaar, even after the June 30, 2023 deadline. The government has provided certain exemptions to specific categories of individuals. If you fall under any of the exempt categories, you do not need to complete the PAN-Aadhaar linking process. The exempt categories are as follows:
Individuals Residing in Specific States
Residents of Jammu and Kashmir, Assam, and Meghalaya are exempt from linking their PAN with Aadhaar due to accessibility issues in these regions.
Non-Resident Indians (NRIs)
As per the Income-tax Act, 1961, non-resident taxable persons are not required to link their PAN with Aadhaar. NRIs are classified based on the number of days they spend in India during the financial year.
Super Senior Citizens
Individuals aged 80 years and above, also known as Super Senior Citizens, are exempt from this requirement. This exemption is in consideration of their age and the difficulties they may face in completing the linking process.
Foreign Citizens
Persons who are not citizens of India do not need to link PAN with Aadhaar. This includes foreign nationals who may possess a PAN for their financial dealings in India but do not hold Aadhaar, which is specific to Indian residents.
Troubleshooting Common Issues While Linking Your Aadhaar and PAN
Troubleshooting common issues while linking your Aadhaar and PAN ensures a smooth process.
Here are the common issues and the ways to go about solving the same:
1. I have paid the ₹1,000 fee to link my PAN with Aadhaar, but they are still not linked. What should I do?
After paying the ₹1,000 fee for linking your PAN with Aadhaar, it may take some time for the linking process to be completed. If your PAN and Aadhaar are still not linked after a reasonable period, follow these steps:
- Check the Status: Visit the Income Tax e-filing portal or the NSDL portal to check the current status of your PAN-Aadhaar linking. Ensure that your payment was successfully processed.
- Verify Your Details: Double-check that the information you submitted, such as your PAN and Aadhaar numbers, is correct. Any discrepancies can cause delays in the linking process.
- Contact Customer Support: If the issue persists, contact the Income Tax Department’s helpdesk or NSDL customer service for assistance. They can provide further guidance and help resolve any issues with the linking process.
- Retry Linking: In some cases, you may need to attempt the linking process again after ensuring that all details are accurate.
2. What should I do if my personal details are incorrect or outdated?
If your personal details such as name, date of birth, or mobile number are incorrect or outdated, you will face difficulties linking your Aadhaar and PAN. Ensure your details are updated on the UIDAI or Income Tax website to proceed with linking. Or you can visit an Aadhaar Enrolment Centre and rectify the same.
3. What if I’m not receiving the OTP for linking?
This issue may occur if your mobile number isn’t registered with UIDAI, due to network congestion, or if your device is in Do Not Disturb mode. To resolve this, ensure your mobile number is registered with UIDAI. You can also try repeating the linking process later or adjust your phone’s settings accordingly.
4. What should I do if I encounter technical errors?
Technical issues might prevent you from linking your Aadhaar and PAN. If you encounter such problems, try clearing your browser cache, using a different browser, or accessing the e-filing portal at a different time.
5. How can I resolve issues caused by a poor internet connection?
Check Connection Stability: Ensure you have a stable and high-speed internet connection.
Retry Linking: Attempt the linking process again when your internet connection is more stable.
6. What if I experience browser compatibility issues?
Sometimes, the browser may not support the Income Tax website, resulting in difficulties while linking Aadhaar and PAN. To resolve this, try using a different browser or clear your browser cache before attempting to link again.
Related Read – Aadhaar Card Address Change
Conclusion
Linking your Aadhaar and PAN is crucial to avoid higher income tax implications and ensure seamless financial transactions. By following the outlined steps, including troubleshooting common issues, you can easily link your Aadhaar and PAN online. It’s a straightforward process that safeguards your financial activities and ensures compliance with regulatory requirements.
Frequently Asked Questions
1. Is it possible to check my PAN Aadhaar link status through the NSDL portal?
2. Is it mandatory to link PAN with Aadhaar?
Yes, linking PAN with Aadhaar is mandatory as per the regulations set by the Government of India. It helps streamline financial transactions, ensures compliance with tax laws, and facilitates identity verification across various services.
3. What is PAN Aadhaar Link Last Date?
The deadline for linking PAN with Aadhaar was June 30, 2023. However, if not linked by this date, one can still link the documents by paying a penalty of Rs. 1,000 via the Income Tax website.
4. What are the documents required to link PAN with Aadhaar?
To link your PAN with Aadhaar, you’ll need your PAN card, Aadhaar card, and an active mobile number linked to your Aadhaar for OTP verification. Access to the Income Tax e-filing portal or authorized platforms is necessary for initiating and completing the linking process online.
5. Who should link Aadhaar with a PAN card?
All taxpayers, except those residing in Jammu and Kashmir, Assam, and Meghalaya, non-residents as per the Income-tax Act, individuals who are not Indian citizens, and individuals aged eighty years or more during the previous year, had to link their Aadhaar with their PAN before 30 June 2023 to avoid their PAN becoming inoperative.
6. PAN-Aadhaar Date of Birth mismatch, what should I do?
If there is a Date of Birth mismatch between your PAN and Aadhaar card, you should update the information on either of the documents to your correct date. Visit the UIDAI portal or Aadhaar Enrollment Centre for Aadhaar updates or the NSDL portal or PAN Service Centers for PAN updates to ensure alignment.
7. What should I do if there is a discrepancy in my PAN and Aadhaar details?
To ensure successful linking of your PAN and Aadhaar, rectify any discrepancies in details such as name, address, etc. Update inaccurate information via the NSDL portal or PAN centres for PAN card details, and through the UIDAI portal or Aadhaar centres for Aadhaar card details. Accuracy and matching information are crucial for linking both documents seamlessly.
8. How long does it take for the linking process to be completed?
The Aadhaar-PAN linking process typically takes about 7 to 30 days for completion after the request is submitted.
9. Can I link my PAN with Aadhaar offline?
Yes, you can link your PAN with Aadhaar offline by visiting a PAN service center and submitting a duly filled Aadhaar-PAN linking form along with supporting documents.
10. Is Aadhaar automatically linked to PAN?
For new PAN card applicants, Aadhaar-PAN linking is done automatically. However, for existing PAN holders, it’s mandatory to link PAN with Aadhaar to facilitate processing of income tax returns and ensure compliance with tax regulations.
11. What happens if my PAN and Aadhaar are not linked?
If your PAN and Aadhaar are not linked, your PAN card may become inoperative, affecting financial transactions over INR 50,000. It’s essential to link them to comply with income tax regulations and avoid potential penalties or higher tax rates.
The post Aadhaar PAN Link Status Check: How to Check Status Online in 2024? appeared first on Razorpay Learn.
]]>The post Aadhaar Update Last Date: How to Update Aadhaar Card Online in 2024? appeared first on Razorpay Learn.
]]>Under the Aadhaar Enrolment and Update Regulations, 2016, individuals holding an Aadhaar card must renew their proof of identity and address documents every ten years from their enrolment date. The UIDAI (Unique Identification Authority of India) encourages timely updates of these documents to prevent fraud and ensure accurate demographic data.
This blog is your one-stop guide to getting your Aadhaar up to speed! We’ll cover everything you need to know, from the Aadhaar update last date (yes, there is one!) to the easiest way to update your information online – for free. Let’s dive in!
Aadhaar Card Update Last Date
The deadline for updating Aadhaar cards without charge on the myAadhaar portal is September 14, 2024. After this date, updating your Aadhaar card with proof of identity and address documents will incur a fee. Initially, the UIDAI offered this online update service for free until March 14, 2024, which was later extended to June 14, 2024, and further extended to September 14, 2024. Therefore, the Aadhaar card renewal last date is now September 14, 2024, and update details will remain free on the myAadhaar portal until then.
Who Should Update their Aadhaar Card?
Individuals who have changed their address, name, or mobile number, or those whose biometric details (iris scans, fingerprints, or facial photographs) have changed significantly, should update their Aadhaar card. Failure to update your Aadhaar card can lead to issues in availing government services, banking facilities, and other services linked to Aadhaar. It is crucial to keep your details accurate and up-to-date.
Related Read: How To Download Aadhaar Card by Mobile Number?
What is the Fee For Updating the Aadhaar Card?
Updating your Aadhaar card online via the myAadhaar portal remains free until September 14, 2024. However, offline updates at physical Aadhaar centers incur a Rs. 50 fee. Post September 14, 2024, a Rs. 25 fee applies for online updates via the myAadhaar portal.
How to Update Your Aadhaar Card Before the Last Date?
You can update your proof of identity and proof of address online. Other updates, such as name, iris scans, fingerprints, and facial photographs, must be done offline at an Aadhaar Enrollment Center or Aadhaar Sewa Kendra.
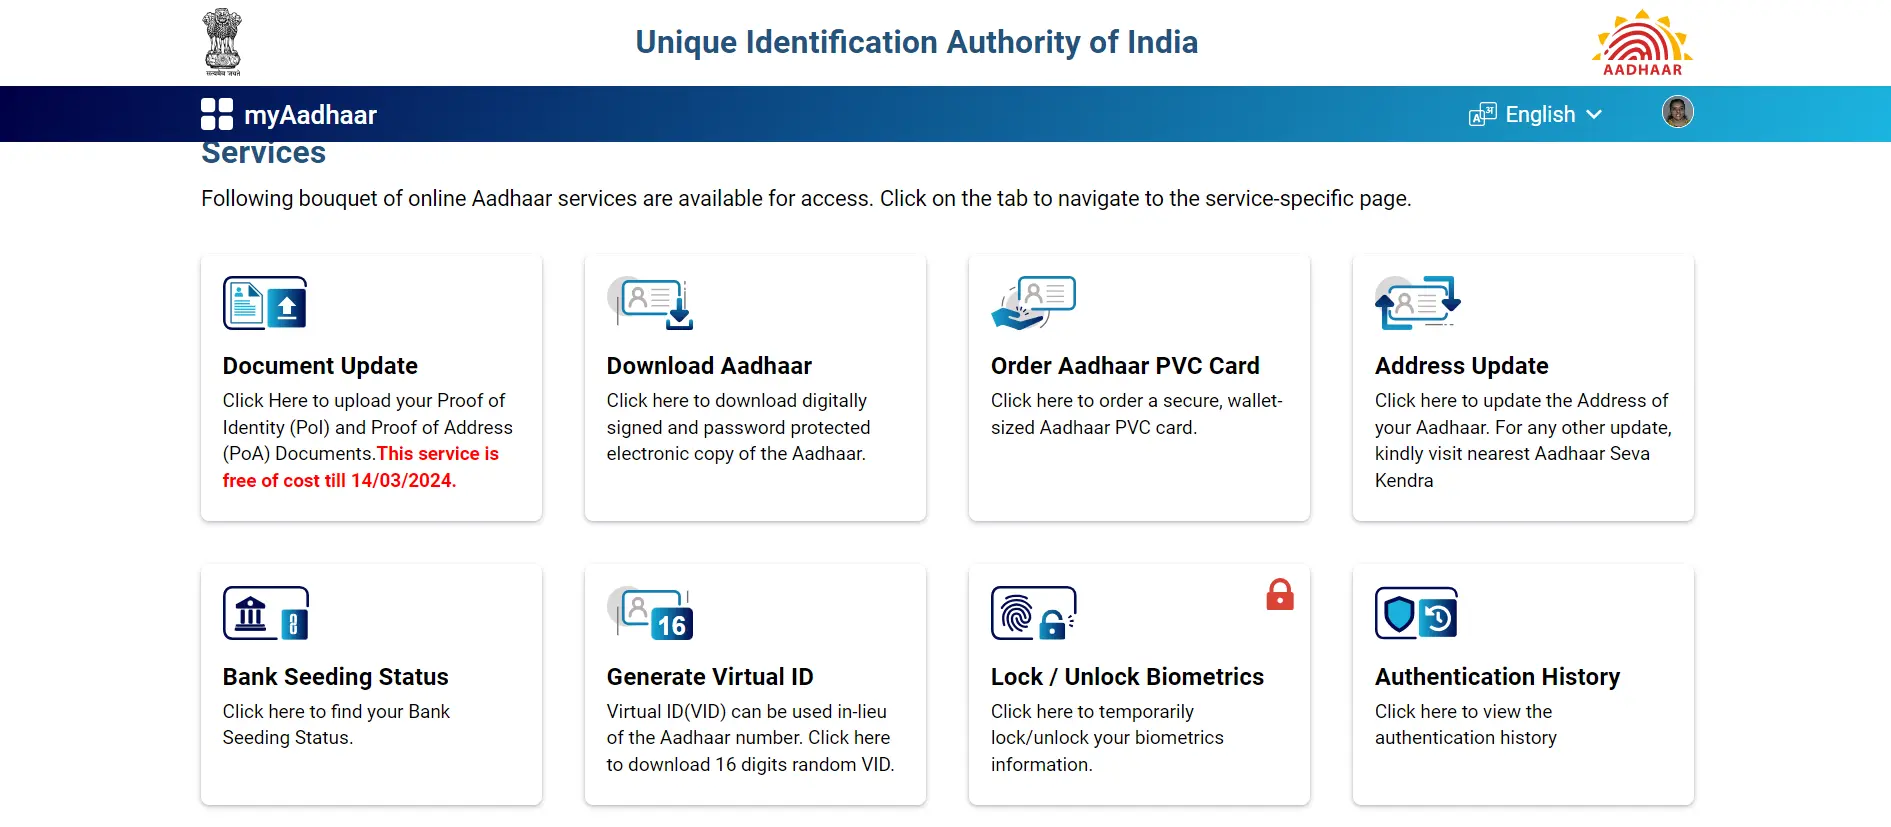
How to Update Aadhaar Card Online
- Visit the UIDAI website.
- Log in using your Aadhaar number and OTP sent to your registered mobile number.
- Click on the ‘Document Update’ button. Select the details you wish to update (Proof of Identity or Proof of Address).
- Upload the required documents.
- Submit the update request and note the Update Request Number (URN) for tracking.
How to Update Aadhaar Card By Visiting Aadhaar Enrollment Center/Aadhaar Sewa Kendra
- Locate the nearest Aadhaar Enrollment Center or Aadhaar Sewa Kendra using the UIDAI locator.
- Carry original copies of the documents you need to update.
- Fill out the Aadhaar update form available at the center.
- Provide your biometrics (if required) and submit the form along with the documents.
- Pay the necessary fee and collect the acknowledgment slip with the Update Request Number (URN).
Related Read: Check PAN Card Aadhaar Card Link Status in 2024
Documents Required To Update Aadhaar Card
To update your Aadhaar card documents on the myAadhaar portal, you need to upload the following:
Proof of Identity (anyone):
- Passport
- Driver’s license
- PAN card
- Voter ID
- Government-issued ID cards (like domicile certificates, resident certificates, labour cards, Jan-Aadhaar)
- Marksheet
- Marriage certificate
- Ration card
Proof of Address (anyone):
- Bank statements (not older than 3 months)
- Electricity or gas connection bills (not older than 3 months)
- Passport
- Marriage certificate
- Ration card
- Property tax receipts (not older than a year)
- Government-issued ID card (like domicile certificates, resident certificates, labour cards, Jan-Aadhaar)
Related Read: How to Download Aadhaar Card By Aadhaar Number, EID, Name, Date Of Birth, and VID?
Frequently Asked Questions (FAQs)
1. When should I update my Aadhaar card?
You should update your Aadhaar card whenever there are changes in your details such as address, name, or mobile number, or if your biometric data has changed.
2. What happens if I don’t update my Aadhaar details?
If you do not update your Aadhaar details, you may face difficulties in availing services linked to Aadhaar, such as government benefits, banking services, and more.
3. How can I check the deadline for updating Aadhaar?
You can check the deadline for updating Aadhaar on the UIDAI website or through official government notifications.
4. Can I update my Aadhaar details online after the deadline?
No, after the deadline, you will need to visit an Aadhaar Enrollment Center or Aadhaar Sewa Kendra to update your details.
5. How often should I update my Aadhaar details?
You should update your Aadhaar details whenever there are changes. It is recommended to review your details periodically to ensure they are accurate.
6. Can I update my Aadhaar details without a registered mobile number?
No, you need a registered mobile number to receive OTP for online updates. For offline updates, you can visit an Aadhaar Enrollment Center.
7. How long does it take for Aadhaar details to be updated?
It usually takes about 5-7 working days for online updates and up to 90 days for updates done at an Aadhaar Enrollment Center.
8. Where can I find more information about Aadhaar updates?
You can find more information about Aadhaar updates on the UIDAI website or by contacting the UIDAI helpline.
The post Aadhaar Update Last Date: How to Update Aadhaar Card Online in 2024? appeared first on Razorpay Learn.
]]>The post How to Change Aadhaar Address Online and Offline? appeared first on Razorpay Learn.
]]>Important Note: The deadline for free online Aadhaar address updates is September 14, 2024. A nominal fee may apply after this date.
Method 1. How to Update Your Aadhaar Address Online?
Here’s the step-by-step guide to change your Aadhaar card address online:
Step 1: Log in to myAadhaar portal by entering your Aadhaar number, captcha code and OTP
- While logging into myAadhaar portal, make sure you have your registered mobile number handy. You’ll receive a one-time password (OTP) on this number to verify your login. This OTP helps ensure the security of your Aadhaar profile.
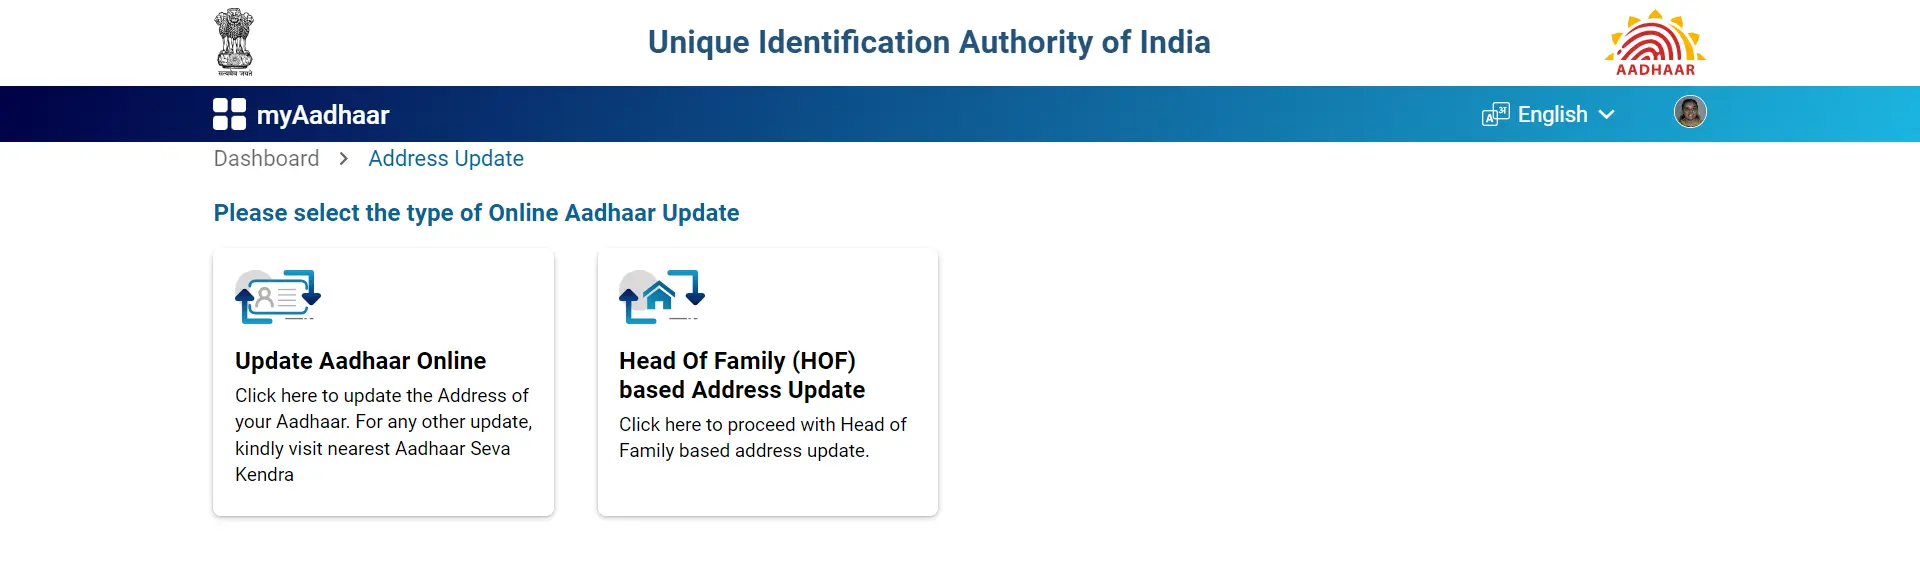
 Step 2: After logging in, select the option ‘Address Update’ tab
- This section is dedicated to updating your address information on your Aadhaar card. Look for the “Address Update” tab or option on the main screen after logging in.
 Step 3: On the next tab, click on the ‘Update Aadhaar Online’ tab
- Here, you will be directed to the section where you can make changes to your Aadhaar details.
 Step 4: Read the guidelines and click the ‘Proceed to Update Aadhaar’ button
- It’s important to understand the instructions to ensure the accuracy of the information you provide.
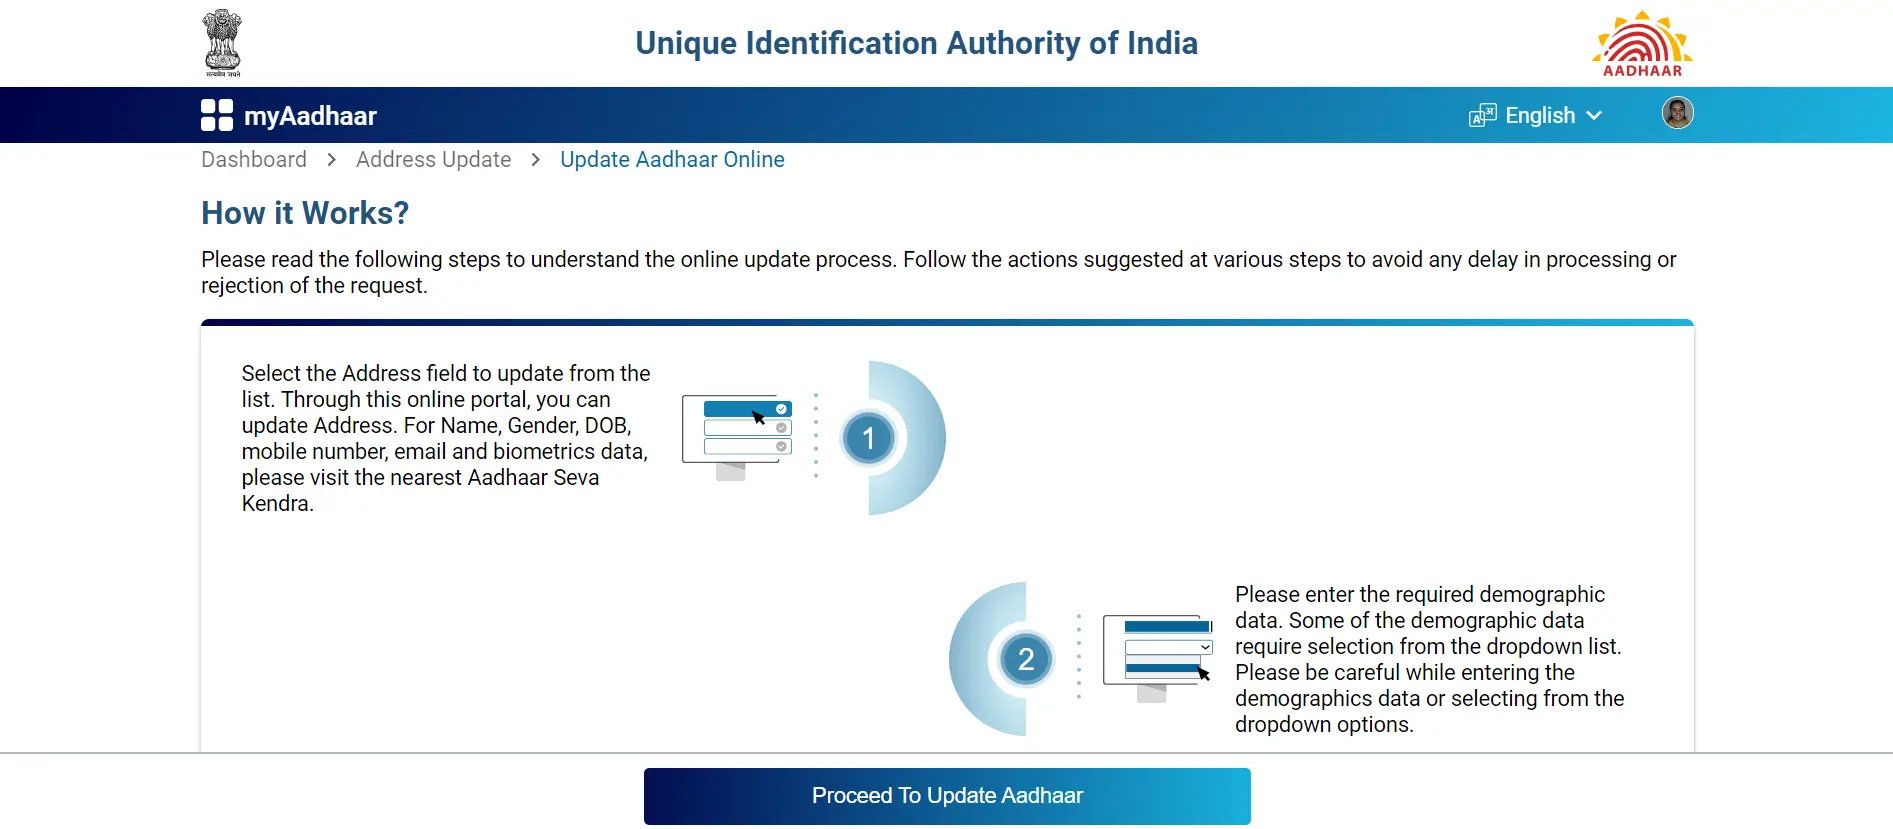 Step 5: Select ‘Address’ and click ‘Proceed to Update Aadhaar’
- This will take you to the form where you can enter your new address details for updating.
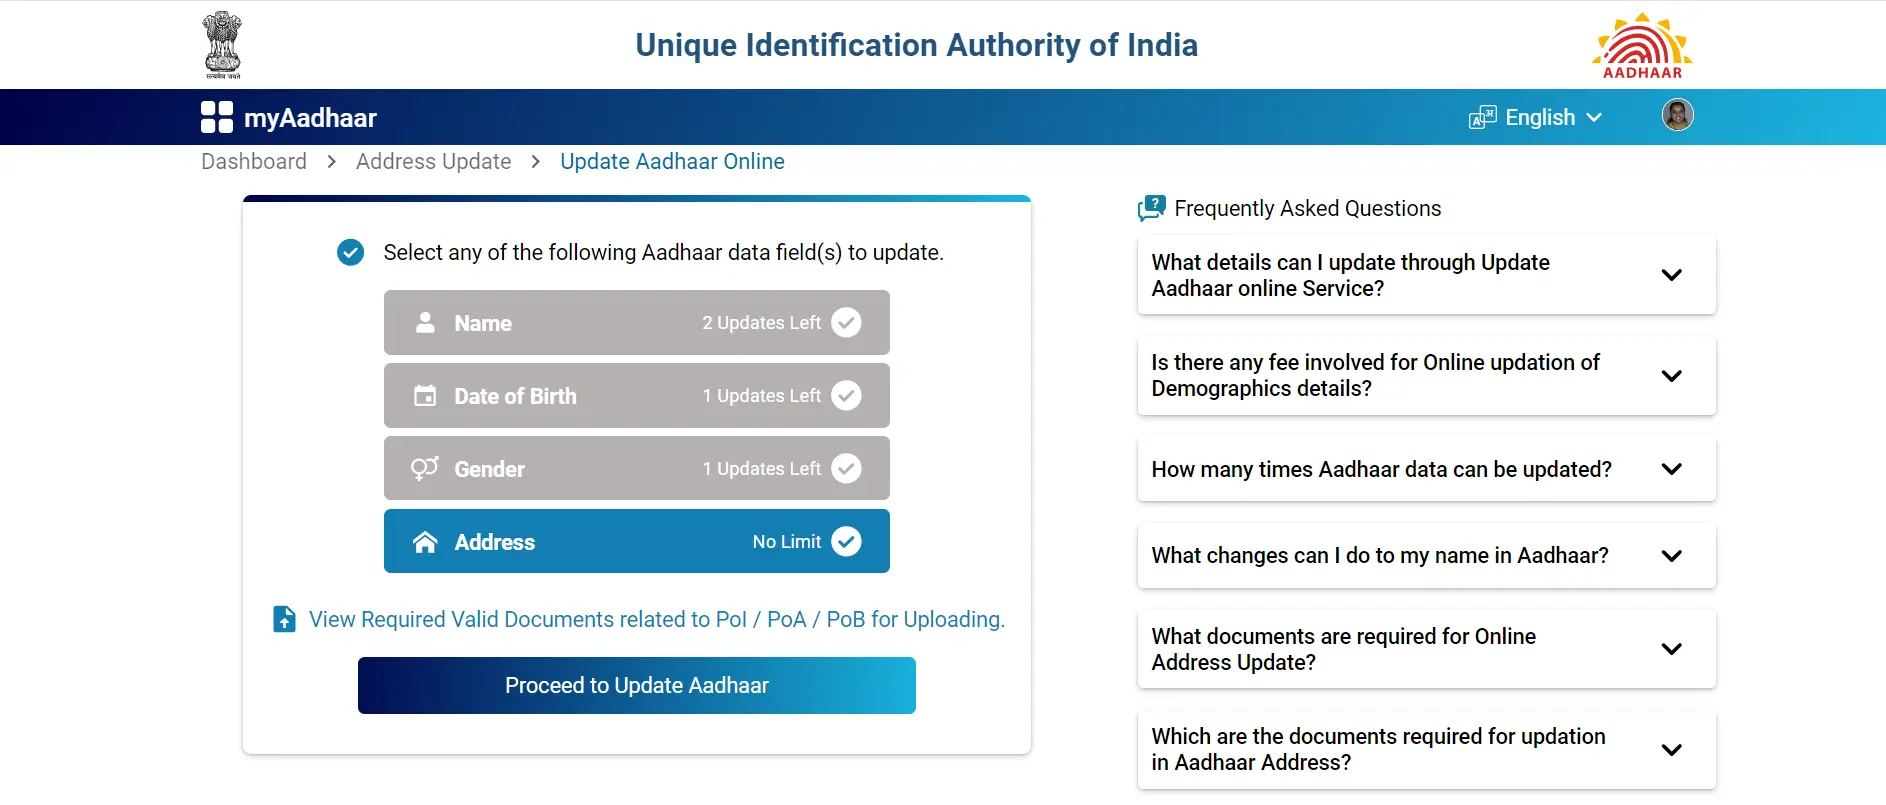 Step 6: Add valid documents
In the online form, you can see the current address. Scroll down and enter ‘Care of’ (father’s name or husband’s name), enter the new address, select the post office, select the proof of address document from the ‘Valid Supporting Document Type’ dropdown list, upload the document and click ‘Next’.
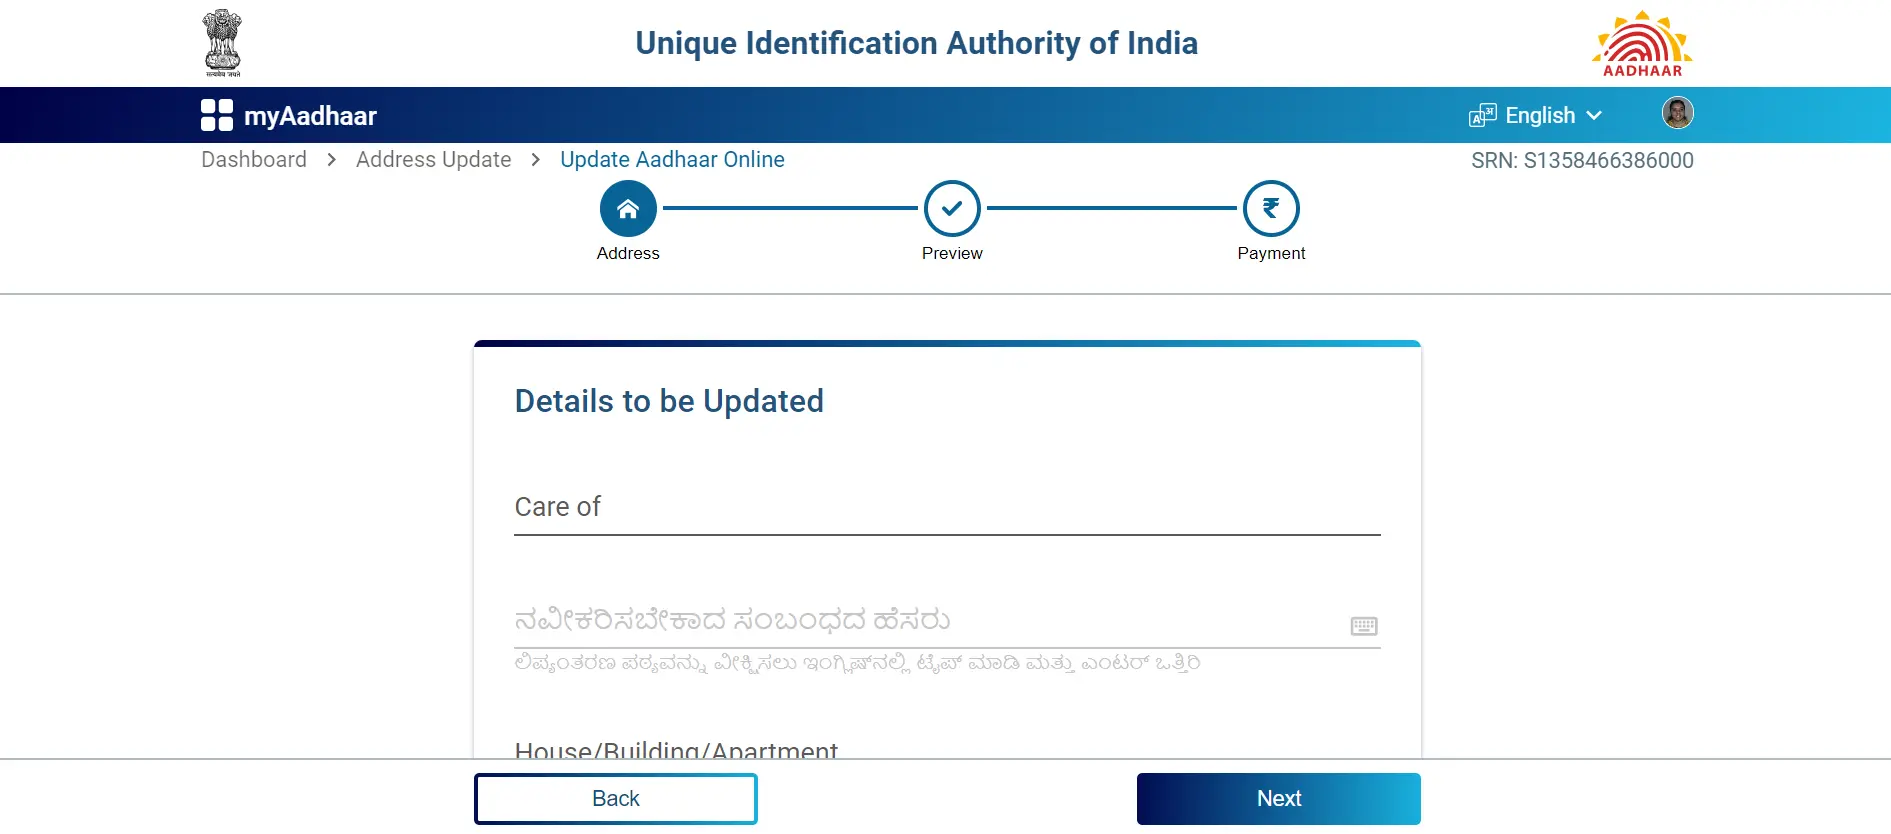 Step 7: Preview the details and proceed to payment. Pay the non-refundable fees of Rs.50.
A Service Request Number (SRN) will be generated. Save it for tracking status later.
Method 2. How to Update Your Aadhaar Address Offline by Visiting Aadhaar Enrolment Center?
While you can update your address online (as described previously), you can also visit an Aadhaar Enrolment Center if you prefer an in-person approach. This option might be suitable for those who:
- Don’t have access to the internet or a smartphone.
- Are uncomfortable updating their information online.
- Need to update additional demographic details like name, date of birth, or gender (along with the address).
- Are children who have turned 15 and require their first Aadhaar card or anyone needing to update their biometric details (fingerprints, iris scan, photograph).
Steps Involved:
- Locate a Center: Use the UIDAI website to find a nearby center.
- Gather Documents: Prepare original and photocopies of address proof.
- Visit the Center: Submit your Aadhaar card and address proof.
- Biometric Verification: Undergo biometric verification if necessary.
- Fee Payment: Pay the required fee. (Generally 50 Rs.)
Benefits of Updating in Person:
- Assistance available: Enrolment center staff can guide you through the process and answer any questions you may have.
- Biometric updates: If needed, you can update your fingerprints, iris scan, or photograph at the center.
Remember, this in-person option is entirely optional. If you’re comfortable with online updates, the previous steps provide a convenient alternative.
Related Read: How to Download Aadhaar Card By Aadhaar Number, EID, Name And Date Of Birth, VID?
Method 3. Aadhaar Card Address Change: Updating Your Address by Post
While online and in-person updates are convenient options, you can also submit an address change request through regular mail. This method might be suitable for those who:
- Don’t have easy access to the internet or an Aadhaar Enrolment Center.
- Prefer a physical record of their update request.
How to Update by Mail:
-
Download the Aadhaar Correction Form: Visit the UIDAI website and download the latest version of the Aadhaar Correction Form.
-
Fill out the Form: Carefully complete the form with your existing details and the corrections you want to make (specifically, the new address).
-
Attach Proof of Address: Include a photocopy of a document that serves as proof of your new address. A list of acceptable documents can be found on the UIDAI website.
-
Mail the Form: Send the completed form and photocopy of your proof of address to one of the following UIDAI addresses:
- UIDAI, Post Box No. 10, Chhindwara, Madhya Pradesh – 480001, India
- UIDAI, Post Box No. 99, Banjara Hills, Hyderabad – 500034, India
What are the Documents Required for Aadhaar Address Change?
For Aadhaar card address change you will need these Proof of Address (POA) documents:
- Passport
- PAN Card
- Bank statement (Passbook, Post Office Account Statement)
- Ration card
- Voter ID
- Disability Card
- MGNREGA/ NREGA Job Card
- Electricity Bills (not older than three months), including prepaid receipts
- Water Bill (not older than three months)
- Gas connection (not older than three months)
- Telephone Landline Bill/ Phone (Postpaid Mobile) Bill/ Broadband Bill (not older than three months)
- Insurance Policy (Life & Medical only)
- Property Tax Receipt (not older than one year)
- Registered sale deed/ gift deed
- Non-registered rent/ lease deed
What if I Don’t Have Any of the Listed Address Proof Documents?
The UIDAI accepts a variety of documents as proof of address for Aadhaar updates. However, we understand that not everyone may have the typical documents listed. Here are some alternative options to consider:
- Certificate of Address with Photo Issued by Officials:
If you don’t have the standard documents like utility bills or bank statements, you can obtain a “Certificate of Address” with your photo. This certificate can be issued by:
- Member of Parliament (MP)
- Member of Legislative Assembly (MLA)
- Gazetted Officer
- Tehsildar
The certificate should be issued on the official letterhead of the issuing authority.
- Explore UIDAI website for full list:
For a comprehensive list of all acceptable documents (including those mentioned above),
How to Check the Status of Your Address Update Request?
Once the updates have been processed, you will receive an SMS saying that your update has been processed successfully.
Here’s How to Check Your Update Status Online:
-
Visit the UIDAI website: Go to UIDAI website.
- Go to ‘Check Aadhaar Update Status’ option under ‘My Aadhaar’.
-
Enter your details: You’ll likely need to provide your Aadhaar number or Update Request Number (URN) to access the status update.
-
View the status: The website should display the current processing stage of your address update request.
Related Read: How To Change Aadhaar Card Name Online and Offline?
FAQs
1. How long does it take to update the Aadhaar address online?
As per UIDAI, Aadhaar card address change time can take up to a maximum of 30 days from the submission of the request.
2. Is there a fee for updating my Aadhaar address?
Aadhaar card address changes online cost Rs.50.
3. What happens if my update request is rejected multiple times?
If your request is rejected, review the information you submitted and ensure your documents are valid. You can then resubmit a new request.
4. How often can I update my Aadhaar address?
There is no limit on the number of address changes allowed.
5. I’m facing technical issues while updating my address online. What should I do?
You can try again or visit the nearest Aadhaar Seva Kendra/ Aadhaar Enrolment Center or through Post mode.
6. What format should the scanned address proof document be in?
The supporting documents need to be in pdf or jpeg format when you are updating your Aadhaar card address online.
7. Can I change the Address on my Aadhaar card without any proof?
No. UIDAI has provided 23 POI and 34 POA lists of valid documents which also include a Certificate of Address having a photo issued by MP or MLA or Gazetted Officer or Tehsildar on letterhead as acceptable proof of address.
8. Can I update my address in my local language on the online portal?
The following regional languages are available for an update of address online: Bengali, Gujarati, Hindi, Kannada, Malayalam, Marathi, Odia, Punjabi, Tamil, Telugu and Urdu.
9. How To Download the Aadhaar Card After Address Change?
First, visit the UIDAI official website and select ‘Download Aadhaar’ under ‘My Aadhaar.’ Then, choose the Enrolment ID option and enter your 28-digit Enrolment ID number along with the captcha details provided.
The post How to Change Aadhaar Address Online and Offline? appeared first on Razorpay Learn.
]]>The post How to Change Name in Aadhaar Card Online and Offline In 2024? appeared first on Razorpay Learn.
]]>This article provides a complete guide about the latest procedures and guidelines for Aadhar card name change in 2024.
How to Update Your Aadhaar Name Online?
It is not possible to update your Aadhaar name in online. Instead, you can visit an Aadhaar Enrollment Center or an Aadhaar Seva Kendra to complete the name change process. This approach ensures a secure process with thorough identity verification. To update your Aadhaar name, it is essential to keep original identity documents handy.
Aadhaar Card Name Change Form
Since the Aadhaar card name change process is offline, you will need to bring important documents along with the Aadhaar card name change form, which can be downloaded from the official UIDAI website.
Documents Required for Aadhaar Card Name Change
As per UIDAI guidelines, We have provided a list of documents required for changing your Aadhaar card name.
- Birth certificate issued by authorised authority,
- Valid Indian Passport (Only for NRIs),
- PAN Card/e-PAN Card,
- Voter Identity Card /e-Voter Identity Card,
- Ration Card/PDS Card,
- Driving license,
- Marriage certificate issued by central government or state government,
- Pensioner card,
- Disability identity card,
- CGHS/ECHS/ESIC/Medi-Claim card with photo issued by state/ central govt./ PSUs,
- Cast certificate issued by central government or state government,
- School leaving certificate (SLC) or school transfer certificate (TC),
- Mark sheet or certificate issued by recognised board of education or university,
- Passbook with photograph issued by a public sector bank,
- Third gender or transgender identity card certificate.
How to Change Name in Aadhaar Card by Visiting Aadhaar Enrolment Center?
STEP 1: Download the Aadhaar Enrolment and Update Form from the official UIDAI website.
STEP 2: Visit your nearest Aadhaar Enrollment Centre or Aadhaar Seva Kendra.
STEP 3: Fill in the required details and give the form to the executive.
STEP 4: Submit your original Proof of Identity document to the executive. They will make a copy and return the original to you.
STEP 5: Pay a fee of Rs. 50 to update your name on your Aadhaar.
How to Check the Status of Your Aadhaar Name Update Request?
It takes up to 30 days for the details to be updated after you submit your Aadhaar card name change request. However, there may be occasional delays. In such instances, you can check the status of your Aadhaar card update by following a few simple steps:
STEP 1: Visit UIDAI’s website
STEP 2: Enter the SRN (Service Request Number) and captcha code.
STEP 3: The status of your update request will be displayed on the screen.
Related Read: How to Check Aadhaar and PAN Card Link Status in Online?
How to Download the Aadhaar Card After Name Change?
Your new Aadhdaar card after name change is delivered to your address. But you can also download your Aadhaar online after changing your name by following these steps:
STEP 1: Visit the UIDAI website and navigate to ‘My Aadhaar‘.
STEP 2: Scroll down to option ‘Get Aadhaar’ and Click on the ‘Download Aadhaar‘ option.
STEP 3: Enter your Aadhaar number and Captcha to download your Updated Aadhaar card.
Read More About: How to Download an Aadhaar Card Using Various Methods
Important Things to be Kept in Mind While Changing Aadhaar Name
When updating your Aadhaar card details, ensure the information you enter is accurate and the attached documents are approved and self-attested.
Here are a few important points to keep in mind:
- Fill in the required details in English or your local language.These are the supported languages- Bengali, Gujarati, Hindi, Kannada, Malayalam, Marathi, Odia, Punjabi, Tamil, Telugu and Urdu.
- Retain the URN (Update Request Number) carefully, as it is essential for tracking your Aadhaar card status.
- If your mobile number is not registered, visit the nearest Aadhaar Enrollment Center to make corrections.
- Attach only the necessary documents as proof along with the form.
- The corrected Aadhaar card will be sent to the address listed on your Aadhaar card so make sure that it is correct and updated.
Related read – Aadhaar Card Address Change Online
FAQs
1. What is the processing fee for updating my Aadhaar card name?
The processing fee is Rs. 50 to change your name on the Aadhaar card.
2. How many times can we change the name on our Aadhaar card?
You can update your name on your Aadhaar card a maximum of two times. In exceptional cases, a third change may be permitted by the regional UIDAI office upon special request.
3. Can I change my name on my Aadhaar card after marriage?
Yes, you can change your name on your Aadhar card after marriage. Just provide supporting documents, like your marriage certificate, to prove the name change.
4. Can I update my Aadhaar card name online in 2024?
No, you cannot change your Aadhaar card name online. However, you can update your Aadhaar card name offline.
5. Where can I change my name on my Aadhaar card?
You need to go the nearest Aadhaar Enrolment Center to change your name on the Aadhaar card.
6. How to change father’s name on Aadhaar card?
You can do it online under the section ‘Update demographic data online’.
7. Can I update my Aadhaar name without any supporting documents?
No, you cannot update your Aadhaar name without any original documents.
8. Do we get a new Aadhaar card after name change?
Yes, once your name change is processed, you will receive a new, updated Aadhaar card delivered to your registered address.
9. How much time does it take to change a name in an Aadhaar card?
UIDAI mentions a maximum of 30 days for processing Aadhar Card name changes. However, approvals often occur within a shorter duration.
The post How to Change Name in Aadhaar Card Online and Offline In 2024? appeared first on Razorpay Learn.
]]>The post Aadhaar Card Download By Mobile Number, EID, VID, Name and Date of Birth appeared first on Razorpay Learn.
]]>This article explores the different methods on how to download an Aadhaar card, providing step-by-step guidance for each approach.
How to Download an Aadhaar Card?
There are multiple ways to download an Aadhaar card. You can use your enrollment ID, Aadhaar number, or Virtual ID to download Aadhaar card from the UIDAI website. Alternatively, you can use the mAadhaar App, UMANG App, or DigiLocker to download your Aadhaar card.
It’s important to note that your mobile number must be linked to your Aadhaar to download it. When you try to download your Aadhaar through any of these methods, you will be prompted to enter a One Time Password (OTP) sent to your registered mobile number.
Read About: How to Get Aadhaar Virtual ID (VID)
How to Download Aadhaar Card Using Enrollment ID or Aadhaar Number?
To download Aadhaar using Enrollment ID or Aadhaar, you can follow these simple steps:
STEP1: Visit the UIDAI website.
STEP 2: Click on Download Aadhaar under the My Aadhaar section.
STEP 3: Select Aadhaar Number/Enorllment ID Number and input the details.

STEP 4: Fill in the Captcha and click on Send OTP.
STEP 5: Select the Masked Aadhaar option if you wish want to receive a masked version of the document.

STEP 6: The e-Aadhaar is a password-protected PDF document. The password is a combination of the first four letters of your name (in capital letters) and your birth year.
What is a Masked Aadhaar?
The masked Aadhaar option enables you to hide your Aadhaar number in the e-Aadhaar you download. When you choose this option, a one-time password (OTP) will be sent to your registered mobile number.
Aadhaar Card Download with Name and Date Of Birth (For Forgotten EID/UID)
STEP 1: Visit the UIDAI website.
STEP 2: Click on Retrieve Lost or Forgotten EID/UID. STEP 3: Enter your name as given on your Aadhaar.
STEP 4: Enter your mobile number or your email id.
 STEP 5: Enter the Captcha and click on Send OTP to receive your EID.
STEP 6: Use this EID to download your Aadhaar from the My Aadhaar section in the UIDAI website.
How to Download Aadhaar Card by Virtual ID (VID)?
STEP 1: Visit the UIDAI website.
STEP 2: Click on Download Aadhaar under the My Aadhaar section.
 STEP 3: Select Virtual ID and input the details.
 STEP 4: Enter Captcha and click on Send OTP to download your e-Aadhaar.
How to Download Aadhaar Card Using mAadhaar App?
The mAadhaar App is the official application launched by UIDAI for users to manage their digital Aadhaar cards.
Here’s how to download your Aadhaar card using the mAadhaar App:
STEP 1: Download the mAadhaar App on your smartphone.
STEP 2: Select your preferred language and enter your registered mobile number.
STEP 3: Enter the OTP sent to your mobile, and the app will be ready to use.
STEP 4: From the home menu, click on the “Download Aadhaar” option to download your e-Aadhaar.
STEP 5: Choose either the Regular Aadhaar card or the Masked version.
STEP 6: Enter your Aadhaar Number, Virtual ID, or Enrollment ID and proceed to download.
Related Read: How To Change Aadhaar Card Address Online?
How to Download Aadhaar Card Using UMANG App?
UMANG offers a unified platform for Indian citizens to access a wide range of e-Gov services, spanning from Central to Local Government bodies across the country.
Here is how you can download Aadhaar card from UMANG App:
STEP 1: Register and Login: First, download and log into your account on the UMANG app.
STEP 2: Access Aadhaar Services: Navigate to ‘Documents’ under ‘All Services’ and select ‘Aadhaar Card’.
STEP 3: Connect to DigiLocker: Click on ‘Login’ to your DigiLocker account. You will be redirected to the DigiLocker home page.
STEP 4: Register or Sign In: If you don’t have a DigiLocker account, register using your Aadhaar-linked mobile number, or sign in if you already have an account.
STEP 5: View Aadhaar Card: Once logged in, you can view your Aadhaar Card on the UMANG app via DigiLocker.
Aadhaar Card Download Using DigiLocker
DigiLocker, part of the Ministry of Electronics & IT’s Digital India initiative, aims to digitally empower citizens by offering access to authenticated digital documents in their digital document wallet. Documents issued through DigiLocker are considered equivalent to their original physical counterparts.
Here is how DigiLocker can be used to download Aadhaar card:
STEP 1: Download and Sign In: Visit the official DigiLocker website or download the DigiLocker app on your smartphone. Sign in to your account.
STEP 2: Select Partner and Document Type: Choose UIDAI (Unique Identification Authority of India) as the partner and select ‘Aadhaar’ from the document type dropdown menu.
STEP 3: Enter Aadhaar Details: Enter your Aadhaar number and the OTP sent to your registered mobile number for verification.
STEP 4: Download Aadhaar Card: Once verified, your Aadhaar card will be available under the ‘Issued’ section of the app.
STEP 5: Use Digitally Verified Aadhaar: You can now use this digitally verified copy of your Aadhaar card for various purposes.
How to Print Your Aadhaar Card After Downloading It?
Once you have downloaded your e-Aadhaar, follow these steps to print it:
STEP 1: Open the file using a PDF reader like Adobe Acrobat or Microsoft Edge.
STEP 2: Enter your password, which consists of the first four letters of your name (in capital letters) followed by your year of birth. For example, if your name is Arjun Mari and your date of birth is 6/6/1999, your password will be ‘ARJU1999’.
STEP 3: Once the file is open, select the Print option and choose the number of copies you wish to print.
Resolving Common Download Issues
When downloading your e-Aadhaar, you may encounter minor issues such as not receiving OTPs or facing technical errors on the website.
Here are some common issues and their solutions:
1. Not Receiving OTP
This issue may occur if your mobile number isn’t registered with UIDAI, due to network congestion, or if your device is in Do Not Disturb mode. To resolve this, ensure your mobile number is registered with UIDAI. If it is not, update it. You can also try repeating the process later or adjust your phone’s settings accordingly.
2. Technical Errors
Technical issues might prevent you from downloading your e-Aadhaar. If you encounter such problems, try clearing your browser cache, using a different browser, or accessing the website at a different time. If the issue persists, raise a grievance on the UIDAI website.
3. Incorrect or Outdated Details
If your personal details such as name, date of birth, or mobile number are incorrect or outdated, you will not be able to download your Aadhaar card. To resolve this, update your details on the UIDAI website.
4. Poor Internet Connection
A slow or unstable internet connection can cause issues while downloading your Aadhaar card. Ensure that you have a stable and fast internet connection.
5. Browser Issues
Sometimes, the browser may not support the UIDAI website, resulting in difficulties while downloading the Aadhaar card. To fix this, try using a different browser or clear your browser cache.
6. Unable to Resolve the Issue
If none of the above solutions work, contact the UIDAI helpline at 1947 or send an email to help@uidai.gov.in for further assistance.
7. Persistent Technical Issues
If technical issues persist despite troubleshooting, visit the nearest Aadhaar Seva Kendra with your Aadhaar number for assistance.
Conclusion
Downloading your e-Aadhaar is straightforward and can be done using the UIDAI website, mAadhaar App, UMANG App, or DigiLocker. Each method involves entering your details and verifying with an OTP sent to your registered mobile number. By following these simple steps and troubleshooting common issues, you can easily obtain your e-Aadhaar, ensuring you have access to your Aadhaar card whenever needed.
Related Read: How to Check Aadhaar and PAN Card Link Status Online?
FAQs
1. Can I download e-Aadhaar without OTP?
No, you cannot download e-Aadhaar without OTP. OTP verification is mandatory for security purposes.
2. Is it mandatory to link my mobile number with my Aadhaar card for downloading it online?
Yes, it is mandatory to link your mobile number with your Aadhaar card to receive the OTP required for downloading it online.
3. How many times can I download my Aadhaar card?
You can download your Aadhaar card as many times as needed without any restrictions.
4. Is there any fee for downloading the Aadhaar card online?
No, downloading the Aadhaar card online is free of charge.
5. What should I do if there is a discrepancy in my downloaded Aadhaar card?
If there is a discrepancy in your downloaded Aadhaar card, update your details on the UIDAI website.
6. What if I face any issues while downloading my e-Aadhaar?
If you face any issues, try troubleshooting or contact UIDAI helpline at 1947 or email help@uidai.gov.in.
7. What is the password to open the downloaded e-Aadhaar PDF?
The password is a combination of the first four letters of your name (in capital letters) and your birth year. For example, if your name is Arjun Mari and your birth year is 1999, the password will be “ARJU1999”.
The post Aadhaar Card Download By Mobile Number, EID, VID, Name and Date of Birth appeared first on Razorpay Learn.
]]>The post Design Thinking in Documentation appeared first on Razorpay Learn.
]]>My first acquaintance with Razorpay Docs began when I joined Razorpay as a Tech Writing Intern. Back then, the platform on razorpay.com/docs was much different than what you currently see. I remember quite liking it!
The docs then had a landing page with the products and subproducts lined up perfectly. The horizontal product line had lovely icons with characteristic colours, and the navigation within those pages was basic and sufficient. It was functional, easy enough and assisted me as much as I requested. I was content with my search and collected positive impressions from repeated but minimal Docs usage.
Which was why I was utterly bowled over when my manager, during the docs-introduction team-onboarding session, said:
As you see, the functionality of Docs could be better…
I simply blinked my eyes at the Zoom screen-share in confusion.
Design Thinking in Documentation
The notion of ‘lack of functionality’ is not a notion at all but a necessary metric to measure the usability of docs, qualitatively and quantitatively. Words like ‘discoverability’, ‘user experience’, and ‘content-correctness’ are used for the same reason.
They are core objectives of designing documentation, visually and structurally. These have evolved over the many years of feedback from interviews and responses woven with design principles.
As for me, I did not realize all this back then. Nor did I know that the current documentation style on Razorpay Docs, which had existed as a V2 Docs Beta then, was part of a redesign project—a revamp that was learning to meet such core objectives of documentation.
It resulted from design thinking—a school of thought that I was yet to learn.
What is Design Thinking
So what is design thinking? To put it simply, it is the process of see-learn-invent-implement.
In the documentation context, design thinking looks at how the user reads the documentation and intends to understand their pain points. Using those insights, it further develops, tests and implements possible solutions.
The approach of design thinking is standardised in a lot of blogs and books through a few steps, which are:
- Empathising with the users and identifying their problems
- Defining the hurdles the users have to overcome in their journey
- Brainstorming and coming up with the possible ideas
- Generating prototypes of ideas and approaches
- Testing, testing and more testing
My first project as an intern was to further reimagine the redesigned V2 Beta docs. In this project, I was to:
- Undertake a competitors’ analysis between Razorpay and any select documentation sites of my choice.
- Write down what they have that Razorpay doesn’t, and rate those docs.
- Present what ideas I had that would make Razorpay Docs better.
I was thrilled, not just because this was a project right up my alley but also because I had resolved to get to the bottom of the ‘lack of functionality’ part.
Learning Design Thinking
You do not learn Design Thinking; you observe it. When a process involves watching and learning, you grasp the requirements and then take action to resolve those pain points.
As a part of my project, I researched, observed and created ideas for documentation that resolved my pain points. Some elements I idealised in Docs based on my personal usage were:
- Building a developer community for users, like many other documentation sites
- Having better aesthetics with corresponding accessibility
- Creating ingenious navigation and content-consumption mechanisms
- Having alt text, videos with closed captions, and the like
- Having tags for the individual pages to make navigation between pages more interactive and intuitive
When I presented my findings, they were well received and appreciated. In that process, I came across my first and significant learning:
Docs are designed to communicate and satisfy a two-way requirement.
- Every user that reaches the Docs has arrived with an intent: to find a resolution as quickly as possible.
- Every Doc is created for one intent: Know what the user wants and fetch that information in record time.
I resolved my pain points through this project while giving ideas based on my research. However, the work wasn’t over; I still didn’t see what the limitations of the functionality in the documentation were.
And so unwittingly, unknowingly, I explored design thinking… via design thinking.
Implementing Design Thinking
The concept note for the redesigned Docs detailed the need for better discoverability and improved user experience. The redesigned docs proposed two significant enhancements:
- Better discoverability: search experience and content navigation.
- Simplified, more accessible content: content structure and layout and interactivity.
Aftermath
The revamped documentation site, the one you see currently on Razorpay Docs, went live with these changes in June 2020. It was a sleek and energetic revamp. In the following months, our Docs Satisfaction measure (Docs CSAT, as we call it) soared.
But this was just the beginning. My own competition analysis detailed that a lot was yet to be done.
My second significant learning comes here:
Design is a process, not a product. It is a continuous process.
Conventionally, we say a product has a great design by its appearance. That’s not wrong, but it is very generic. More often than not, it takes a while to recognise that in addition to its aesthetic value, we must look for its functional value too.
Razorpay Docs in the V2 Beta looked better than the old one. It had a better aesthetic design, signature colours, visual indicators, and more. The Docs catered to the user well because it was designed well. And vice versa. It checked off many boxes:
 |
Functionality: can the Docs give users what they need for whatever reason they need it? |
|
Aesthetics: how smartly does the appearance provide Razorpay’s image and promise? |
|
Discoverability: can the users find the items they are looking for? |
|
Navigation: how well are users able to locate and contextualize the information? |
|
User experience: how is the overall experience and satisfaction of the users? |
The Docs Redesign in June 2022 was a one-time project, but we had to reach multiple other destinations. So we took measures to build upon that.
Design Thinking is a Continuous Process
When design itself is a process, how could design thinking not be one too? Experts claim this openly: design thinking is not a linear, single-track process. It is messy and repetitive, and what worked at first might not make sense after a while.
No matter how high you soar, you still scratch surfaces again. You must.
After the new designs went live, we worked on improving the documentation a whole lot more. What we have improved since then is for you to discover and tell us how you feel about it via the User Feedback module.
As for what we continued to do, we did that by taking up projects to understand the user. These worked initially, but we soon reached a stagnation point. Then we changed our approach and will change it again when applicable. That’s how it works.
In Hindsight
It wouldn’t make sense to talk so much about design thinking if I do not see how it applies to designing my write-ups. My writing and my understanding towards writing technical content have evolved in the process, and I am still imbibing my third learning:
Write with solid intent after understanding the user persona.
It reflects the most in my structuring and language, a stark but gradual shift from the write-ups I created as a Content Writer. What I wrote once was a glorifying advertising stunt, which has now become informative and immediately actionable.
Intentional writing understands the users’ needs and provides the necessary information. If not intentional, documentation will fail its core objectives.
To Conclude
A massive chunk of Docs relies on the content, the raw material that must be written intentionally and is easy to consume. Talking to users and understanding where they are struggling with the content, design, structure, information, and experience is the key to creating incredible documentation.
Docs are an essential aid in helping users understand what the product offers. It is a great self-help tool that allows users to understand concepts, explain how-tos, help them integrate and troubleshoot. By using design thinking in the authoring, designing and delivery process, you always maintain sight of your users; the outcome is invaluable.
The post Design Thinking in Documentation appeared first on Razorpay Learn.
]]>The post Why Do We Need Visual Aids in Tech Writing? appeared first on Razorpay Learn.
]]>Visual elements in technical documentation help end users absorb complex information, understand new concepts and finish their tasks faster.
Types of Visual Aids
There are different types of visual aids that tech writers can add to enrich the content.
- Charts and Diagrams: Flow charts help users to understand processes from start to end. By having a pictorial representation, users can grasp the process and ensure that they do not miss out on any of the key steps. Sample flow chart.
- Infographics: Oftentimes, it is crucial to highlight certain calculations and values in the documentation. Having them in tables or paragraph format might make users overlook them due to the information overload. Infographics make it easier to visualise data. Sample infographic.
- Videos and GIFs: Explainer videos, with or without voiceover, are excellent resources for users to quickly learn about products, concepts and procedural steps. Sample video
- Screenshots: Product UI images that help the user connect the instructions to the interface. Sample screenshots
 4 Reasons Visual Aids Are Important
- Simplifies complex content
The most important reason to add visual aids such as screenshots and diagrams is to break the content into smaller, understandable pieces. This simplification enables the user to grasp the concepts better. The visual cues help them to relate to the ideas better.
For example, in the aviation industry, flight manuals come with detailed diagrams and images to ensure pilots and other officials can absorb the information well. Another example is a map that helps users navigate or understand the layout of complex buildings.
2. Improves retention
Our minds are able to retain details when it is displayed to us in visual form. The usage of vivid colours and shapes helps our brains to store information. Studies have shown that people are more likely to remember information when it is presented in a visual format. Compared to text, images are processed by the human brain at a speed 60,000 times faster. Furthermore, visual information accounts for 90 percent of the information that is transmitted to the brain.
3. Saves time
Some users are visual learners. Sometimes users do not have enough time or do not want to put in the effort of going through lengthy text. They want to quickly get the information they need to go ahead and get the job done.
In fact, at Razorpay, when we conducted feedback sessions with users to understand the efficacy of our documents, we realised that users preferred watching our dashboard videos rather than reading the steps. Videos definitely help in faster dissemination of information.
4. Improves accessibility
Adding visual elements makes your documentation accessible to a wider audience. For example, readers who may struggle with written language can benefit from the use of visual aids such as images, diagrams, or videos.
In the case of visual impairments, visual aids can provide alternative ways of presenting information through braille, tactile images, or audio descriptions.
Ending Notes
When selecting a visual aid, it is critical to consider the purpose of the writing, the target audience, and the type of information. Visual aids are powerful tools for writers looking to enhance content clarity, engagement, and memorability. When used effectively, visual aids can add an element of creativity and interest to a piece of writing, making it more enjoyable for readers to engage with.
Start using visual aids to enhance the communication process and improve the overall quality of your writing.
The post Why Do We Need Visual Aids in Tech Writing? appeared first on Razorpay Learn.
]]>The post Journey from Bricks to Clicks: The Definitive 10-Step Guide to Taking Your Offline Business Online appeared first on Razorpay Learn.
]]>Whatever may be the case for the big shift to take place, it is here to stay. And businesses and consumers alike need to embrace this evolution so they can align themselves to a natural trajectory of growth and evolution.
For small businesses, especially, the thought of pivoting to a digital one might seem like a gargantuan task – one which requires a huge investment in terms of resources, manpower, time, and money. We put together a comprehensive guide to lay to rest the myths and misconceptions that surround it, and provide you with a step-by-step process to taking your offline business online.
In this ebook, you will gain insights on:
- Every step to follow to successfully pivot to an online business – right from establishing your digital presence and hiring new teams to planning your marketing and positioning and setting up digital payments
- The tools and platforms that will come in handy to automate and track each and every aspect of your online business, such as customer relationship management, social media management, web analytics and much more
- The challenges you might face along the way and how you can plan to overcome them to complete the transition smoothly
By following the detailed steps and actionable checklists outlined in the ebook, along with improvising solutions to a few unique problems that might be specifically relevant to your business, you will be on the path to unlocking growth in the digital world.
The post Journey from Bricks to Clicks: The Definitive 10-Step Guide to Taking Your Offline Business Online appeared first on Razorpay Learn.
]]>The post Bridging the Missing Middle: How Our MSMEs Grew Post-pandemic appeared first on Razorpay Learn.
]]>We looked at our Razorpay data, spoke to our merchants on the consumer behaviours they saw, and analysed how our MSMEs grew post-pandemic. Through this data report, we share with you some key insights that can help you plan your business growth strategies in the ongoing pandemic.
In this data report you will learn:
- How MSMEs in India grew in the last 15 months (post-pandemic)?
- Strategies adopted by MSMEs to cope with the changing consumer behaviour
- Digital adoption trends among MSMEs & how that reflected on digital payments
The post Bridging the Missing Middle: How Our MSMEs Grew Post-pandemic appeared first on Razorpay Learn.
]]>